Table of Contents
- There is water in the basement – is this the only sign that you need waterproofing?
- Waterproofing of the basement of the private house
- Types of waterproofing
- What materials are used for waterproofing the basement
- Waterproofing of the basement from groundwater-Stages of work from the inside: seams and cracks, walls and foundation
- Waterproofing of the basement. Price per m2
- Make waterproofing of the basement with your own hands
The basement of any building, whether it is a private house or an administrative building, should be properly protected from moisture and water penetration. For this purpose, during the construction of a building or a private structure, waterproofing and good protection are provided on the outside of the basement.
But, unfortunately, it happens many times, so, after the house is built and all construction work is completed, water begins to appear in the basement of the house. The penetration of water into the basement is expressed by puddles on the floor or wet spots on the walls. The existence of these problems means that the waterproofing of the house outside is broken somewhere and the foundation, floor and walls in socle or basement are no longer protected. In this case, the most correct option is to dig out the house, and completely redo the waterproofing from the outside.
Thus, it is the concrete or brick itself (from which your basement is made) that will be maximally protected from water penetration and further destruction (which eventually leads to leaks inside). If for some reason it is impossible to repair the waterproofing from the outside, then there are measures with which you can protect your private building from the inside.
There is water in the basement – is this the only sign that you need waterproofing?
Here are a few common signs that may mean that it’s time to do the right, reliable and high-quality waterproofing of your basement:
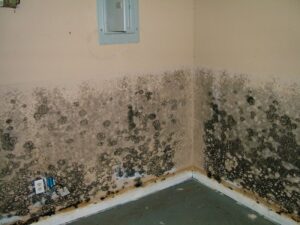
- Mold or fungus: this may be caused by excess moisture in the air, even if groundwater is not collected in your basement, if there is a violation or lack of good waterproofing outside the foundation, concrete, blocks, or bricks will absorb water and moisture and give it inside your room, thereby subsequently forming mold or fungus in your basement. Mold can also be dangerous for health if left untreated.
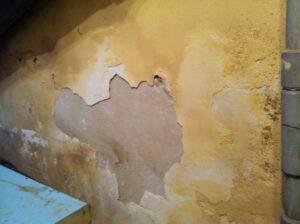
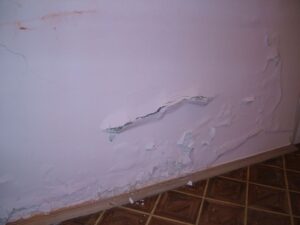
- Peeling paint and plaster: the paint can be peeled off the walls for many reasons; perhaps it was the wrong paint or the surface was not properly prepared. However, most likely, there is an excess of moisture in the wall that you are trying to paint, which leads to the destruction of the finishing elements from the inside.
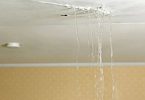
- Leaks: bare basement walls can leak and sometimes form wet spots and condensation. This is most likely caused by the lack of proper or good waterproofing from the outside.
- Dry rot: this mold and blackish-brown fungus usually appear as a byproduct of the decomposition process. It can grow as a result of water leaks and excessive dampness.
- Flooding or permanent leaks: If there is water in your basement, it means that the waterproofing that should be done from the outside is missing or has become unusable.
In this case, water penetrates into the concrete or brick foundation, finds its way through voids and cracks, and appears in your basement.
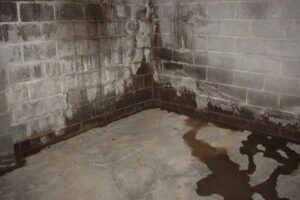
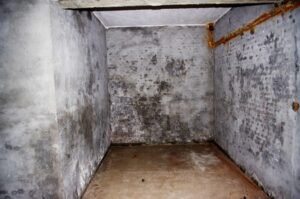
If you notice one or more of these warning signs in your basement, it indicates that the insulation of your basement from the outside is missing or has become unusable. The most dangerous thing in this situation is that water penetrates into the concrete or brick foundations of your foundation from the outside, moisture stagnates in the structure, undergoes climate change (freezes in winter and melts in spring), and thereby destroys concrete, bricks and other foundations, forming cavities and microcracks in them, which can subsequently lead to serious damage and cracks in the wall of the basement.
Waterproofing of the basement of the private house
Before performing finishing works in the private sector, it is necessary to protect completely the surfaces and the basement floor from moisture penetration.
Finishing the basement structure is a big investment, which certainly needs protection. If moisture somehow gets inside, drywall, paint, wallpaper, carpets on the floor, electronics, and furniture will be damaged. To protect the house, some steps can be taken in order to minimize potential future problems that destroy the finished foundation.
Before finishing, the private basement should be inspected by a waterproofing contractor who is able to identify and properly solve any existing or future problems with the house. Some nuances regarding waterproofing are not obvious to the untrained eye. This phase is the private owner’s last chance to make sure everything is in order before it’s too late.
Types of waterproofing
To protect your basement completely from the penetration of moisture and water, you need to perform high quality. waterproofing the outside of your house during the construction of the underground part of the building. There are two main types of waterproofing of underground parts of the building: Vertical and horizontal:
- Vertical – protects the walls of the basement, foundation, and socle from the effects of groundwater and high water.
- Horizontal – it serves as a shut-off waterproofing and protects the basement floor and cold joints of the foundation and wall from the penetration of water and moisture into the room.
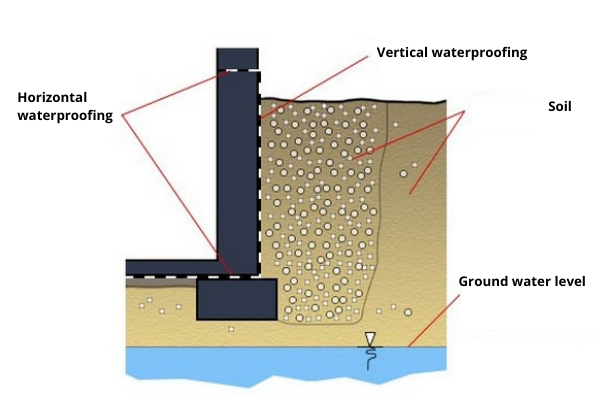
If for some reason, it is impossible to arrange waterproofing or protection from the outside, then it should be done from the inside. By protecting the basement from the inside, you will not solve the root of the problem, but you will get rid of the water in the basement.
You can read more about the vertical and horizontal waterproofing methods in the following articles:
- Vertical waterproofing: materials and methods of its installation
- Horizontal waterproofing of the foundation: The technology of installation and the materials, needed for this
What materials are used for waterproofing the basement
There are many different types of waterproofing materials on the market at present. Basically, they differ in quality, composition, scope, and method of application. The main materials that are used to perform waterproofing works:
Injection waterproofing
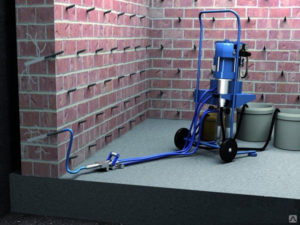
Injection waterproofing is the most common and effective method of waterproofing the basement, slab, and walls from inside the room. Injection materials are various modifications of polyurethane resins and gels of various densities and viscosities. These materials, depending on their type, have different coefficients of elasticity and expansion.
Injection formulations are injected into the seams and the body of the structure using special pumps that inject under high pressure. This pressure allows injection formulations to penetrate into voids, microcracks, and pores of concrete, brick, or other foundation, thereby squeezing out moisture and sealing them from further penetration of water. Waterproofing by injection is suitable for the following constructs:
- Walls
- Foundation slab
- Ceiling
- Floor slab
- Sealing cracks
- Sealing seams
- Sealing pipe entry points and communication to the house or building
You can read more about how to perform injection works properly when protecting a basement or a room from the inside in this article in the section “Stages of complex waterproofing”.
You can read more about injection waterproofing on the whole in the article – Injection waterproofing.
Penetrating compositions
Penetrating compositions are mainly used in the arrangement of internal insulation. These compositions are applied with a roller and brush. Due to the abundant moistening of the surface, the applied material penetrates into the structure of concrete or brick and creates something like a waterproof film.
Disadvantages:
This type of insulation does not work on destroyed or hollow sections of concrete or other composition, as it cannot form a film on the void. This circumstance does not allow penetrative compositions of the Penetron type to work effectively in problem areas of the structure (in most cases, water passes in such areas).
You can read more about the penetrating method in the article – “Penetrating waterproofing: Detailed description of its work on the concrete, types of materials and application technologies“.

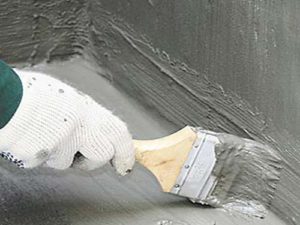
Polymer cement
Polymer cement insulation is made on the basis of cement mixtures with polymer additives. These compositions can be applied either manually or by spraying. Polymer cement insulation is suitable for performing work outside and inside the structure. During interior work, it is very important to choose polymer-cement compositions that withstand negative water pressure from the outside to the inside, for example, materials of the HydroPaz series from the German company Hydro.
You can read more about cement waterproofing in the article – “Cement-based waterproofing: Features, types, and methods of its application”.
Advantages:
- It works both on positive and negative water pressure
- 100% adhesion to the surface
- No seams

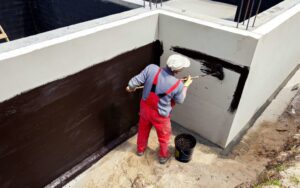
Coating
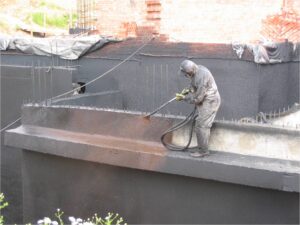
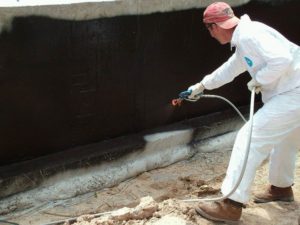
The coating materials are applied by the coating method using a roller, brush, or spatula. Today there are a large number of different coating mastics, varied by quality, composition, and type of surfaces on which they should be applied. These materials are applied mainly from the outside.
Main types:
- Bitumen-based mastics
- Polyurethane mastics
- Double-component polyurethane mastics
Advantages:
- No seams
- 100% adhesion to the base
- Resistance to the aggressive environment (for high-quality polyurethane mastics)
- High coefficient of elasticity (for high-quality polyurethane mastics)
Disadvantages:
Bitumen and polyurethane mastics do not withstand negative water pressure from the outside to the inside, accordingly, these materials are not suitable for the application as insulation of the basement from the inside without the installation of a clamping, by the type of protecting wall or screed.
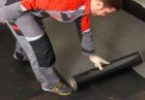
Rolled on a bitumen basis
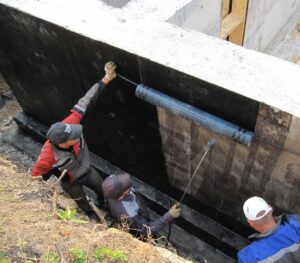
Rolled materials are made in the form of bitumen-based rolls. The rolls are deposited on the surface with the help of burners and fire in several layers, overlapping the formed seams of the first layer.
For different surfaces, there are different rolled materials with modifications suitable for a particular surface, for example, it is recommended to use membranes of the Technonicol Foundation series from Technonicol company for foundations. Roll membranes are used mainly from the outside of the underground part of the house.
Advantages:
- Relatively cheap.
- Available in most construction markets and stores.
Disadvantages:
- Availability of seams – seams are the weakest points in any insulation.
- Lack of adhesion to the surface – the material does not completely adhere to the base, as a result of which water can stagnate and walk under the waterproofing carpet, moving from one place to another.
- Does not withstand negative water pressure.
- Low coefficient of elasticity – by the shrinkage of the house or its dynamics, rolls may come apart at seams.
- Fire mounting method.
You can read more about roll waterproofing in the article – “Roll waterproofing installation with the detailed instructions on its arrangement”.
Membrane
PVC membranes are fixed with the use of mechanical fasteners in the form of pressure strips and are suitable mainly for external work. PVC membranes are supplied in rolls and stitched together using a special hair dryer that supplies hot air. Membranes are mainly applicable for waterproofing arrangements from the outside.
Disadvantages:
- Availability of seams – seams are the weakest points in waterproofing coating.
- Complete lack of adhesion to the surface – membranes are laid on the base as a carpet, respectively, in case of the formation of the slightest hole in the seams or the body of the membrane, water will penetrate under it and will stagnate there, moving from one place to another.
- Lack of elasticity – by the shrinkage of the house or its dynamics, the seams and joints can be gapped.
- The complexity of installation.
- Does not withstand water pressure from outside to inside.
You can read more about membrane waterproofing in the article – “Membrane waterproofing: Types of materials and methods of their arrangement“.
Liquid rubber
Liquid rubber – this is a bitumen-latex emulsion designed for the arrangement of high-quality and professional waterproofing. Liquid rubber is mainly used for external waterproofing of foundations, basements, and other structures. Liquid rubber is applied by spraying or by hand.
Advantages:
- A single coating without seams and joints.
- 100% adhesion to the base – water cannot wander under the coating, passing from one corner to another.
- Resistance to minerals and aggressive environment.
- Follows the shape of the surface – suitable for application on an uneven surfaces.
- The coefficient of elasticity is more than 800%.
- Non-firing method of application.
You can read about this type of waterproofing in the article – “Waterproofing with liquid rubber“.

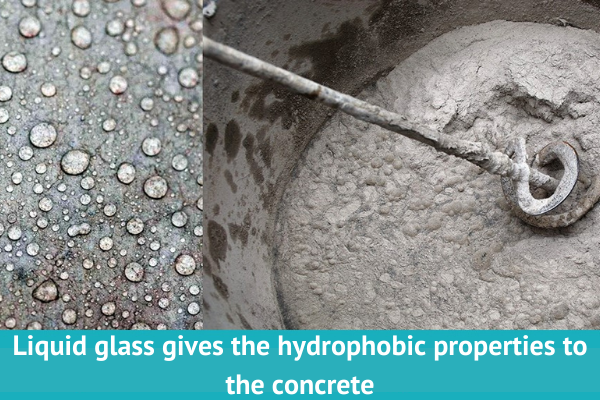
Liquid glass
Liquid glass is a liquid substance that is supplied in cans and mixed with concrete mixtures to make them resistant to moisture and water. In fact, this method of insulation is extremely inefficient, since liquid glass is not able to stop real leaks and water pressure.
Comparison table between the properties of different materials
The following table compares the main types of waterproofing systems:
| Liquid rubber | Surfaced bitumen-based membrane | PVC membrane | |
| Mounting method | Non-firing | Firing with a burner | With a hair drier and mechanical fixation |
| Availability of seams | Not available | Available | Available |
| Adhesion to the base | 100% | 40% | No adhesion |
| Coefficient of elasticity | 600-800% | 10-20% | 10-20% |
| Installation rate m2/ per 1 day | 400-600 | 20-50 | 30-60 |
| Warranty period for works | 7 years | 3-5 years | 1-2 years |
Waterproofing of the basement from groundwater-Stages of work from the inside: seams and cracks, walls and foundation
If you find leaks or wet walls in your basement and want to solve this problem from the inside, then you need to identify the problem areas – where exactly the water passes:
Concreting joints and seams (abutment, slab, wall)
- Interlocking seams
- Construction body
- Cracks in concrete or brick
- Floor slab
The list of necessary works and the stages of their implementation depends on the location of the leak and its nature.
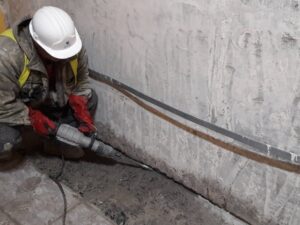
Joints, seams, and cracks
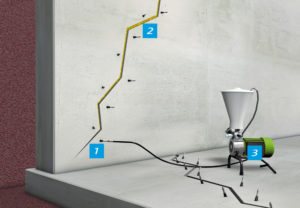
If you find that the problem with leaks has formed in the area of cracks, seams, or at the joints of the plate wall, then you need to follow the following steps of work:
- Pointing up – Cracks and joints are pointed up by the method of a small indent installation.
- Sealing contraction – The installed indent is cleaned and the expanding sealant is compacted there in layers
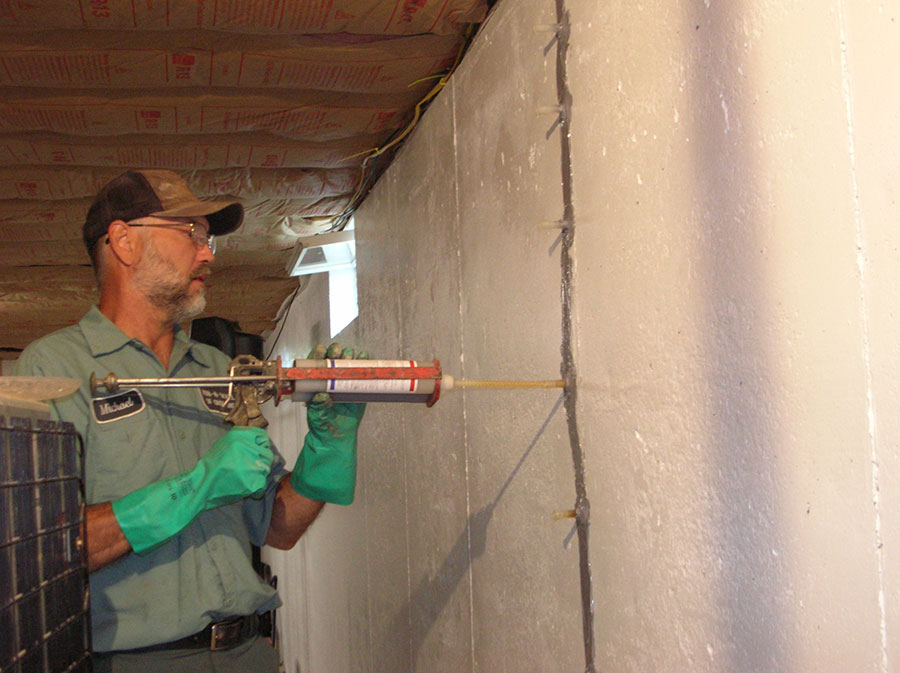
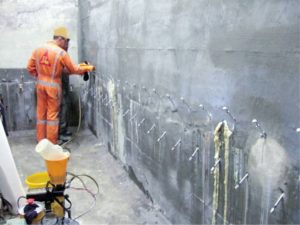
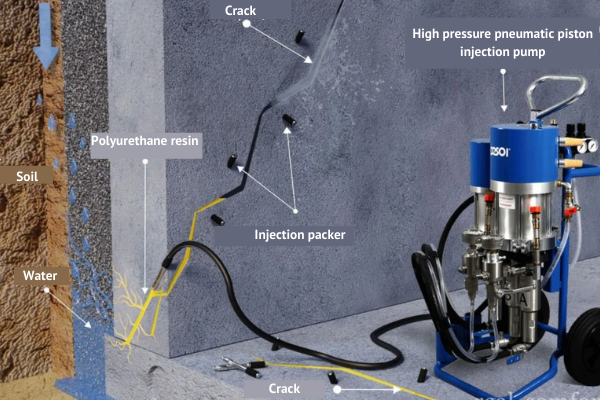
- Installation of packers– Holes are made along the perimeter of the joint or crack at a certain angle, where hollow tubes (packers) are inserted.
- Injection – an injection pump is connected to the packers, which, under pressure, delivers the injection compound inside the required base. Under pressure, the injection resin penetrates into all possible voids, thereby filling and sealing them.
- Repair – Installed packers are removed, and existing holes are sealed with sealants.
You can read more about waterproofing of seams and cracks in the following articles:
- Sealing and waterproofing of concrete, cold and deformation seams
- Waterproofing and sealing of cracks in concrete, brick, and other foundations
Waterproofing of basement walls from the inside
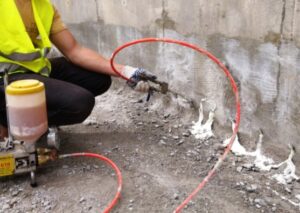
If moisture comes from the body of a concrete wall or floor, then you need to take the following steps to protect these surfaces:
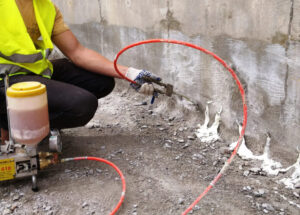
- Elimination of active leaks and moisture collection sites – If you find several places on the wall, ceiling or floor where water is actively flowing or moisture appears, then they should be locally injected.
- After the local sealing of problem areas has been performed, a special waterproofing compound should be applied to the entire surface, which works for separation, or rather for negative water pressure from the outside to the inside. Ideally, such waterproofing is applied from the inside to the floor with access to the walls up to ground level.
Recommendations: To protect the floor and foundation from the inside of the basement, it is best to use a waterproofing compound of the type BASF, HydroPaz from the German company HYDRO. When choosing a material, do not forget that the cheaper the composition, the worse its characteristics and the less it will last.
Waterproofing of basement walls of blocks
If the walls of the basement floor are made of Solid Foundation Blocks (FBS blocks), then there will be a lot of interlocking seams in such a structure, and seams are the weakest point through which water will flow first of all. In the presence of such a construct, the following steps should be taken:
- To perform reinforcement and ceiling – to point up all interlocking seams, clean them and layer-by-layer compact them with an expanding sealant;
- To perform an injection – for the arrangement of sealing to the thickness of the entire interlock space, and not just the outer part.
- Finishing protection – to apply the finishing layer of waterproofing composition, working for the pressure of moisture from the outside to the inside.
You can read more about methods of Solid Foundation Blocks (FBS) waterproofing in the article – “Waterproofing of foundation and walls blocks“.
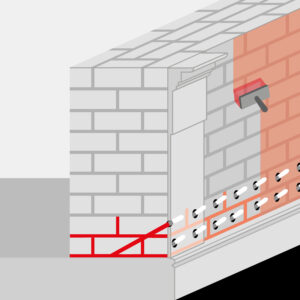
Installation scheme of basement waterproofing of Solid Foundation Blocks (FBS)

Waterproofing of basement brick walls
Brick walls have many seams, not to mention that the brick itself absorbs water and moisture very well. Accordingly, if the basement is made of brick, then this greatly complicates the implementation of high-quality and durable waterproofing, without the use of expensive injection over the entire area of the basement wall structure.
With the availability of a brick basement, it is necessary to perform the following stages of work:
- Brick should be covered with a non-shrink repair compound;
- To fill all voids in the wall, polyurethane or gel composition should be injected into the body of the structure;
- Apply mineral waterproofing, working for the negative pressure.
You can read more about methods of brick waterproofing in the article – “Waterproofing of bricks and masonry”.
Installation scheme of the brick basement waterproofing:
Waterproofing of basement foundation
When they say about the basement foundation, they mean either its walls, about which we wrote earlier or the foundation slab of the basement floor. If we are talking about a floor, as a basement foundation, then in the absence of proper protection from water, this structure can pass water and moisture into the room.
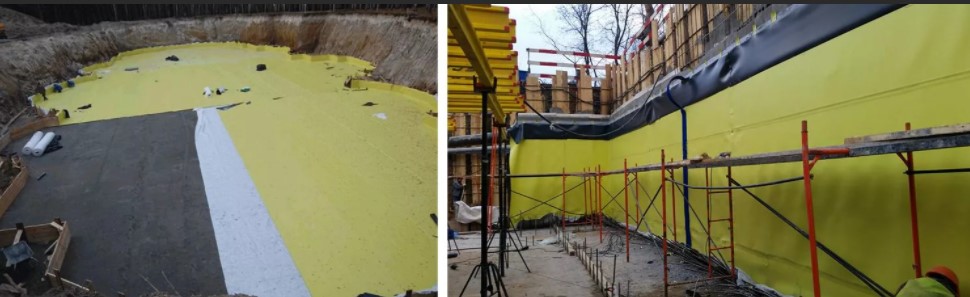
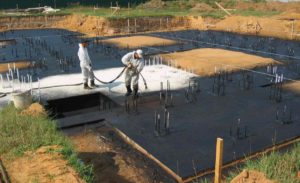
Ideally, the waterproofing of the basement foundation is done even during its construction and it looks like this:
1. A well-rammed base made of a layer of crushed stone and a layer of sand;
2. Poured concrete base, at least of 5sm thick;
3. Laid or applied waterproofing on a rigid base (previously made concrete bed);
4. Separation layer;
5. Insulation (optional depending on the purpose of the room);
6. Separation layer;
7. Reinforced frame for the future foundation slab (or floor);
8. Installation of a profile of swelling bentonite (swelling bentonite cord) along the perimeter of the future joint of the foundation or floor with walls to seal future cold joints;
9. Filling the floor slab or basement foundation.
You can read about waterproofing of foundation and floor from the inside in the article – “Waterproofing of the basement floor of the house: Methods, installation technologies, and materials”.
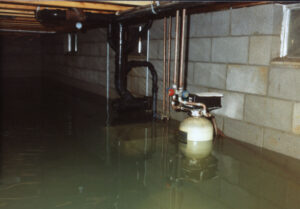
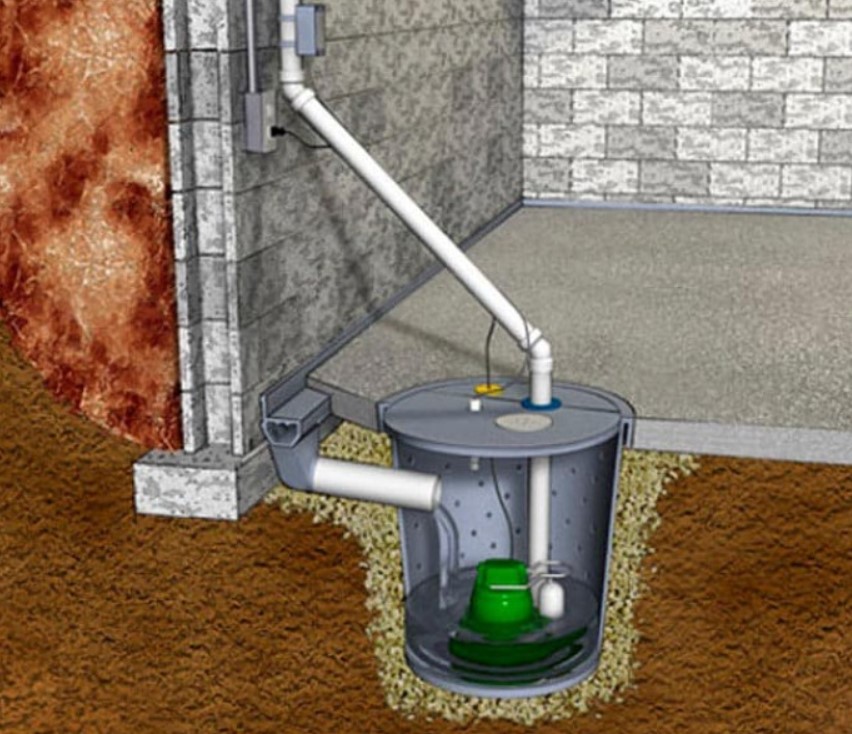
Waterproofing of pit
A pit is a kind of hole inside the basement in the floor slab or foundation, where water that has entered the basement for some reason should be accumulated. In fact, the aim of the pit is to collect water from the basement and not let it stagnate in the room itself. As a rule, a pump is installed in the pit and when water enters, it manually or automatically turns on and forcibly moves water to the street or into the storm sewer.
Since the pit is a kind of artificial hole in the floor and it is on the border of the ground, there are very often situations in which groundwater or just moisture gets into the basement room from the pit made. To avoid the ingress of water from outside into the pit, it is necessary to make its high-quality waterproofing and pay due attention to it during construction.
How to make a pit right from the very beginning:
1. The arrangement of a hole in the foundation or floor slab
2. Installation of the formwork
3. Installation of the reinforced frame
4. Laying of a swelling bentonite cord at the locations of future concreting joints
5. Filling the pit using high-quality concrete with the addition of waterproofing additives
6. Cover the pit with a special mineral-based waterproofing material that can withstand not only positive fluid pressure but also negative one (from outside to inside).
Waterproofing of the pit from the inside of the pit is already made and skips water:
- Sealing of all cold joints and concreting joints by injection, so as to restore the protection of these weak points inside the concrete;
- To cover the concrete waterproofing surface which can keep the water, coming from the outside, for example, polymer-mineral compositions HydroPaz.

Waterproofing units of the pit and water drainage from it:
Waterproofing of the basement. Price per m2
Prices for waterproofing works may vary depending on the complexity, performance of work, and non-standard solutions. To get an accurate price, it is recommended to call a waterproofing specialist to inspect your basement and draw up a technical specification for waterproofing work. Below there are the average prices for waterproofing works, outside and inside the basement.
Works from the outside per m2
| Works description | Unit of measurement | Price in $ |
| Arrangement of surfaced waterproofing | m2 | 5 |
| Installation of PVC membrane | m2 | 8 |
| Installation of polyurea | m2 | 13 |
| Arrangement of mastic waterproofing | m2 | 3 |
| Installation of liquid rubber by spraying | m2 | 3 |
| Installation of liquid rubber manually | m2 | 5 |
| Arrangement of cement-mineral double-component waterproofing | m2 | 8 |
| Arrangement of polyurethane waterproofing | m2 | 8 |
| Application of primer coating | m2 | 2 |
Works from the inside per m2
| Works description | Unit of measurement | Price in $ |
| Waterproofing of cold joints: -installation of indenting -cleaning the indenting -layer-by-layer sealing of non-shrinkable composition | running meter | 8,5 |
| Waterproofing of interblock joints: -installation of indenting -cleaning the indenting -layer-by-layer sealing of non-shrinkable composition | running meter | 6 |
| Waterproofing of expansion joints: -installation of indenting -cleaning the indenting -elastic profile sealing -sealing of non-shrink compound -a complex of works on injection | running meter | 70 |
| Injection waterproofing of seams / cut-off waterproofing -installation of indenting -cleaning the indenting -layer-by-layer sealing of non-shrinkable composition – installation of boreholes and packers – a complex of works on injection -the dismantling of packers and sealing of injection holes | running meter | 17 |
| Injection waterproofing into the concrete body -marking, installation of boreholes and packers – a complex of works on injection – the dismantling of packers and sealing of injection holes | m2 | 27 |
| Injection waterproofing into the brick body – marking, installation of boreholes and packers – a complex of works on injection – the dismantling of packers and sealing of injection holes | m2 | 17 |
| Cement-mineral waterproofing | m2 | 9 |
| Penetrating waterproofing | m2 | 9 |
| Waterproofing of communication entry points: -installation of indenting -cleaning the indenting – layer-by-layer sealing of non-shrinkable composition -installation of boreholes and packers – complex works on injection – dismantling of packers and sealing of injection holes | piece | 98 |
The calculator of the cost for basement waterproofing
Calculation of waterproofing cost
The total cost of waterproofing
Make waterproofing of the basement with your own hands
It is quite simple to make waterproofing the basement with your own hands if we are talking about a private dry basement in which there are no real leaks. However, if the basement of a private house is problematic, then it is highly not recommended to do the work yourself, with your own hands. One of the reasons is the lack of in-depth knowledge in waterproofing and in the assortment of possible protective materials.
Another reason why it is not recommended to perform such responsible and complex work with your own hands is that seemingly simple waterproofing systems actually require quite serious preparation for their proper application in the house. For example, the surfaced roll materials, during installation, it is not easy to be deposited with a burner on the bases.
When they are deposited, it is necessary to follow clear rules, take into account the time of deposition, angle, etc. (in the absence of proper knowledge, you can simply overheat the bitumen and it will not work as expected – which will subsequently lead to leaks). When performing work with your own hands, you can follow the steps indicated in this article:
- Injecting problem areas in the buried parts of the house below ground level.
- Application of polymer-cement waterproofing withstanding negative water pressure.

Important: If you decided to make waterproofing with your own hands, then be sure to consult with specialists about the installation technology of a particular waterproofing system – non-compliance with the technology, in the future it may lead to leaks and destruction.