Table of Contents
- What is a cellar and what is it being built for?
- Types of cellars:
- How to make a turnkey cellar with your own hands in a private house?
- Prices for the construction of a turnkey cellar
- Features of construction of a cellar under a house or garage
- Features of cellar construction at high-ground waters
- Features of the construction of a wine cellar
- Features of the construction of ground cellars
Underground, semi-underground and aboveground cellars are traditionally used for storing various items, including food, household goods, and other products used for household needs.
The construction of cellars includes a number of critical stages and is also carried out in compliance with the rules, necessary to ensure the safety of things stored in the basement. In this article, we will talk about how the construction of turnkey cellars is carried out, as well as the cost of such work.
What is a cellar and what is it being built for?
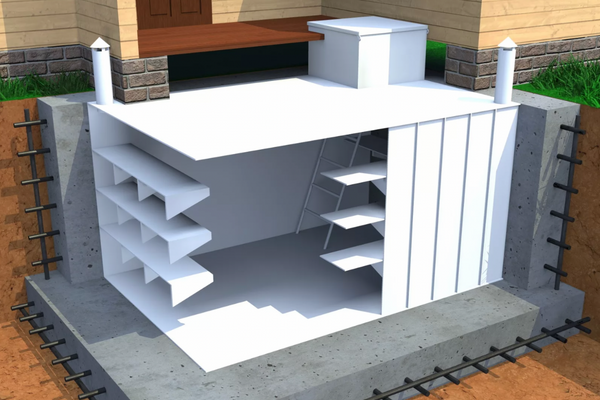
A cellar— is a small room with a buried, semi-buried structure. Traditionally, such spaces are used for the storage of agricultural products and various conservation, but recently cellars are increasingly played the role of technical premises. The main elements of any cellar are reinforced walls and a reliable ceiling that can withstand mechanical loads, as well as the effects of atmospheric precipitation. Cellar walls are most often made of standard materials — concrete, brick, stone, or wood.
Cellars can be decorated with facing materials or equipped without them, especially if the structure is located in sufficiently dense ground. The construction of the cellar includes not only the arrangement of the room itself but also the addition of its materials and systems that regularly lower the temperature, protect from moisture and provide high-quality ventilation of the enclosed space. Also, in order to avoid spoilage of food or other products, it is recommended to create very dim lighting in the cellar, which will not allow food to spoil.
Do not confuse the cellar with the basement. The basement is usually part of a residential building, and the cellar can be located at a significant distance from the building. Also, the basement, unlike the cellar, is able to perform many different functions, for example, to serve as a place for communications and equipment, act as a warehouse, act as a parking lot for cars, or even serve as a workshop for potters, shoemakers, jewelers and not only.
The wide functionality of basements allows them to be used as an additional useful area not only in residential buildings but also in industrial enterprises, shopping malls, and office buildings.
However, it is important to understand that both basements and cellars are constantly in contact with soil rich in dangerous substances. Therefore, underground (for aboveground) buildings need high-quality waterproofing that can protect the exterior of the room from the effects of liquids and aggressive chemicals.
Types of cellars:
Today there are several types of cellars. They differ from each other depending on the type of soil in a particular area, the groundwater level, the depth of freezing of the soil, as well as on the location that was chosen for the cellar. However, the main criterion is the material from which the elements of the room are made. What cellars are considered the most reliable?
Brick cellars
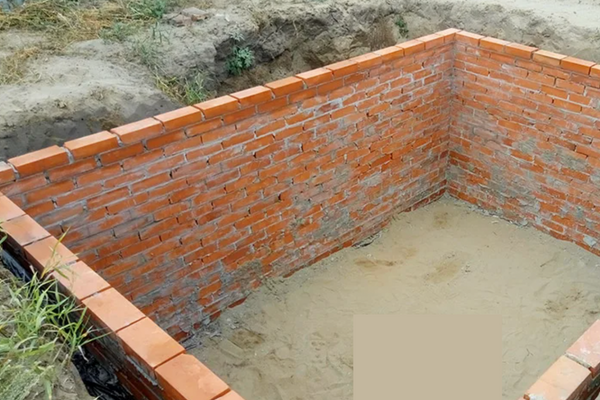
Often, burnt red brick is used as the main material of the cellar. It is worth noting that only high-strength types of bricks are suitable for this purpose, and not, for example, silicate ones with a sufficiently “loose” structure. An important role in the arrangement of brick cellars is played by sealing the seams of brickwork. Experts recommend using surfaced compositions mounted on the outside of the structure as waterproofing materials. Coating compositions and impregnations distributed from the inside of the structure can serve as a good alternative to rolled materials.
Brick cellars are characterized by high thermal conductivity and excellent strength, due to which the structures in question can withstand even very serious mechanical loads. However, this type of cellar can hardly be called easy to install and operate. For the arrangement of the cellars in question, it is important to have some experience in bricklaying, and in the absence of such experience, it would be best to turn to professionals. As for the operation of brick cellars, in the event of a breach of the tightness of the seams between the bricks, flooding may occur, as a result of which the products stored in the cellar will suffer significantly.
Concrete cellar
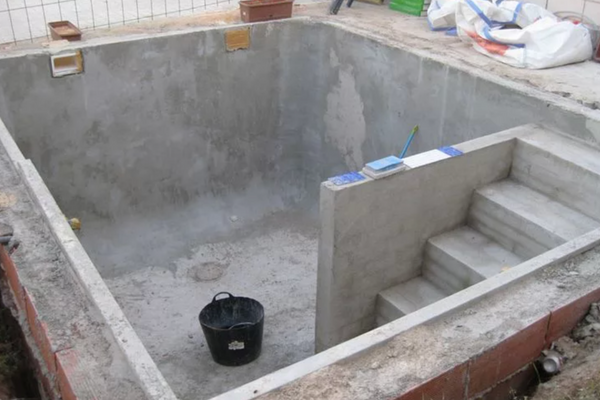
Concrete monolithic cellars require the arrangement of the formwork and reinforcing frame before pouring the main material. Prefabricated structures are mounted using ready-made reinforced concrete elements made in the form of rings or square blocks. Also, concrete cellars are quite “demanding” for hydro and thermal insulation. As the latter one, polystyrene foam or bitumen mastic is often used. An obligatory stage is the installation of finishing materials, as well as the internal arrangement of the room — the installation of storage spaces, stairs, hatch, and ventilation system.
The main advantages of concrete cellars are that they are not subject to corrosion, can be of any shape and area, and are considered very easy to install and operate. Among the disadvantages — are typical disadvantages of concrete, such as possible violations of the tightness of the material and the risk of shrinkage cracks, which in severe cases can lead to the destruction of the concrete cellar.
Cellar of blocks
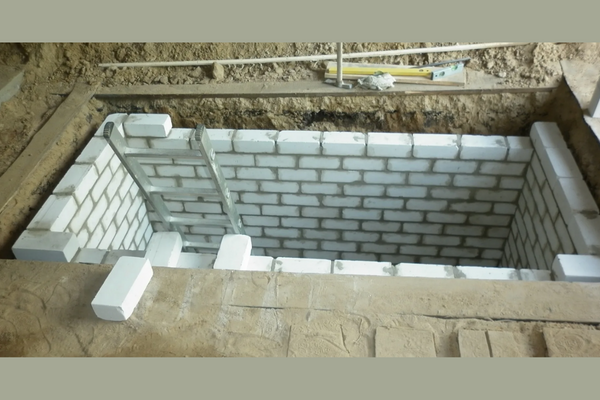
Cellars, made of blocks, for example, expanded clay, are very easy to install, so even the most experienced builders will be able to cope with this process. The blocks are lightweight, they are very simply fastened together, forming a reliable underground structure at the same time.
Other advantages of the cellars made of expanded clay concrete blocks include:
- Resistance to any climatic conditions;
- Environmental safety, long service life;
- Resistance to low temperatures, high thermal conductivity;
- Fire safety, excellent vapor barrier;
- No shrinkage of the walls;
- Low price and easy installation.
Among the disadvantages of block cellars, the following points are distinguished:
- Instability to strong mechanical loads;
- High “exactingness” to the quality of waterproofing and ventilation system;
- The necessity to design the foundation using a different, more durable material.
Plastic cellar
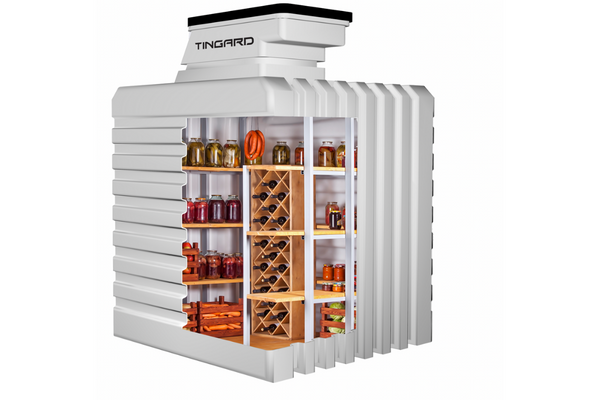
A plastic cellar is a ready-made container that is installed in a pit prepared specifically for it. Such a container is absolutely sealed, so it does not let moisture pass into the storage of products. If the cellar is large enough, then prefabricated plastic molds are used, the connection of which involves the formation of seams. Such seams need additional processing before direct use of the cellar. The most popular forms of such cellars are considered cubic and cylindrical.
The indisputable advantage of plastic containers can be considered as their full complement: such forms already include ventilation, places intended for storing food, as well as a hatch, and a ladder through which you can get to the cellar. Also, the plastic from which the cellars are made is resistant to temperature changes and is not subject to rotting and corrosion, the structure itself is not only easy to install, but also simply cleaned and removed if necessary.
However, plastic containers at the same time are characterized by a fairly high price, lack of resistance to “flooding” of the soil (in such cases, the cellar risks surfacing) and a limited area.
How to make a turnkey cellar with your own hands in a private house?
The cellar is characterized by low temperature, almost complete absence of lighting, as well as high humidity, in which not all materials are able to contact. At the stage of cellar construction, it is important to choose only moisture-resistant materials that are not prone to rotting, corrosion damage, and destruction under the influence of condensate.
Artificial lighting installed in the cellar should also be resistant to moisture. Consider the materials suitable for all the criteria listed above, as well as the main stages of the construction of turnkey cellars.
Materials for construction
The requirements for the materials from which the cellar is made are determined by the location of the structure, as well as the features of the territory on which the construction is being carried out. In any case, materials characterized by a porous structure or the presence of voids are not recommended for use. Among such materials – are gas and foam blocks, hollow bricks, and not only. Their structure allows them to retain heat, but the effect of moisture is destructive for them. It is worth noting that not all dense materials are suitable for the cellar arrangement. For example, you should not rely on formulations made using polymer or mineral substances.
Experts recommend making a choice in favor of more traditional materials. For example, a brick perfectly “resists” the effects of moisture, and brick walls (if their tightness is observed) are not exposed to the negative consequences of contact with aggressive chemicals. However, only burnt red bricks should be chosen as the main material, and not silicate ones in any way, and even ceramic bricks may not withstand flooding of the ground: the seams between the bricks are not adapted to restrain strong water pressure for a long time.
Concrete will also be an excellent solution, but its porous structure is considered very “demanding” for high-quality waterproofing. If you reliably protect the concrete surface from external influences, you can count on the fact that this material will serve for many years and keep the room dry even when the groundwater level rises. The most suitable option is concrete grades of M400, W10, and higher. Concreting can be handled independently, however, the preliminary fixation of the formwork and the installation of the reinforcing frame is best entrusted to professionals.
As already mentioned, cellars can be made of blocks, and also ready-made plastic containers can be used as their basis. However, the most proven solutions are still structures made of brick or concrete.
The main stages of construction
The construction of the cellar includes a number of important stages, which should be observed to ensure the high functionality of the room and its long service life. Let’s consider the obligatory procedures, without which it will not be possible to properly equip the cellar.
- Preparatory stage. The first stage includes the preparation of the pit, in which the cellar will be equipped. The dimensions of the recess are selected individually and depend on the future dimensions of the storage for products. The pit should always be made slightly larger than the cellar itself, so its dimensions should exceed the length and width of the room by about half a meter on each side. Before digging the pit, marking is performed, according to which the work will be carried out. The depth of the pit is also determined at the preparatory stage.
- Groundwork. After taking measurements, wooden stakes are fixed at the corners of the future cellar, through which a strong cord is pulled. Due to the designation of the boundaries of the recess, it is possible to perform the work very accurately. The top layer of turf should be removed from the entire designated perimeter and stored for the future. This turf may later be necessary to disguise an underground or semi-buried cellar. After preparing the pit of the required size, the “walls” of the pit are aligned according to the level, and the bottom of the recess is qualitatively compacted.
- Pouring the foundation. The material with which the bottom of the pit is rammed, as well as the material from which the cellar foundation is made, are determined depending on the type of soil, the groundwater does not reach the basement of the cellar, sand or gravel used as the base, which is carefully compacted.
If the groundwater is located high enough, and there is a real risk of flooding the cellar, before pouring the foundation, it is necessary to install waterproofing on the pit mills, which will protect the walls and floor of the cellar from the outside. The foundation is poured as follows: a frame is formed from the reinforcement elements, which is fixed inside the pit, and also, if necessary, rises to the desired height with the help of bricks.
This is followed by the installation of beacons over the entire area of the bottom of the recess, after which the cement mortar is poured. The thickness of the foundation should be small: most often it does not exceed 0,04 meters. It is worth noting that the drying of the basement of the cellar takes quite a long time: before it is possible to continue construction work, it should take at least 2-3 weeks. - Arrangement of walls. The installation of external waterproofing and the pouring of the foundation is followed by the installation of the walls of the future cellar, which are most often made of bricks, cinder blocks, or concrete blocks. The laying of the walls begins from the corners of the pit to the sides. The fixing composition is cement mortar or clay, and the maximum thickness of the layers is 12 mm.
The walls, like the foundation, in most cases, need a metal frame (for example, made of steel), which is installed in the walls every three layers of the base material. It is also necessary to periodically take measurements, check the area of the future cellar and make sure that it remains level. In the case of above-ground cellars, the entrance to the room can be carried out not through a hatch located on the ceiling, but through a door installed in the wall. Then it is necessary to leave a hole in one of the walls of the cellar, into which a doorway will later be mounted.
Also, the walls of the cellar need finishing both internal and externally (if there is access to the walls of the cellar). Paints, whitewash, or standard plaster is used as finishing materials. At the same time, it is extremely important that the material is resistant to moisture and low temperatures. Underground cellars are also sometimes decorated with wooden boards, which also help to strengthen the frame of the room. - Waterproofing of the cellar during construction. Any cellar needs high-quality heat and waterproofing. Work on the installation of protective materials can begin only after the concrete from which the foundation is made is completely solidified, and in some cases also the walls and ceiling. Polystyrene foam will serve as an excellent option for insulation.
If we talk about waterproofing, then it should be installed both inside and outside the cellar. It was already about sheets of hydrophobic material that are fixed on the bottom and sides of the pit at the initial stage of construction. The selected waterproofing material is also mounted on top of the concrete floor, the arrangement of which will be discussed a little later.
On top of the hydrophobic composition, the roof surface is treated with a clay solution, the thickness of which should not be less than 10 centimeters. Waterproofing is also mounted on top of the frozen clay composition, most often represented by traditional roofing material or film materials, and installation is carried out in several layers.
After installing the waterproofing, you can proceed to the formation of the finishing coating: turf is laid on top of the underground cellar, and ennobled by grass or other vegetation. In order to avoid flooding the cellar, the installation of waterproofing should also be carried out from inside the room. The walls of the cellar, the corners between the floor and the walls, as well as all seams and joints between materials are treated with hydrophobic compounds.
The type of waterproofing is selected based on the type of soil and the groundwater level in it. Especially relevant is the installation of hydrophobic materials for brick cellars, which are characterized by a large number of seams and joints between the elements of brickwork.
In addition to hydrophobic treatment, brick bases are also plastered (plaster serves as an additional protective layer). Experts recommend choosing plaster materials made on a cement basis. Such compositions perfectly withstand the effects of moisture and low temperatures and are also characterized by high-strength indicators. - The arrangement of the cellar overlap. For a cellar installed on a plot of land under a private house or near it, a wooden frame is most often used as an overlap. It includes wooden boards with a cross-section of 5*5 sm and sections of plywood, the thickness of which is 1 sm. The frame is assembled in the form of a dome, resulting in a dome-shaped structure.
This design is fixed to the walls of the cellar and covered with plywood sheets from above. The final stage is to strengthen the frame with a reinforcing mesh, which is made of reinforcement bars immediately before installation. The grid is raised to the desired height using small bars.
After performing these works, it is important to fill the entire floor area with a concrete mixture and wait for the solution to dry immediately. The next stages of the cellar construction can be started only after the concrete composition has solidified. - Installation of stairs. Also, a very important step is the installation of a cellar ladder, which will provide access to the room. Such a ladder should be very strong, withstand significant loads, and not have too large an angle of inclination. For cellars with a small area, you can use ladders, in other cases, it is recommended to choose stationary structures, for example, spiral or marching stairs.
Metals, bricks, concrete, as well as wood, are considered optimal materials for the manufacture of stairs. Wooden stairs should be treated with special protective solutions before use, preventing damage to the material under the influence of moisture. If a doorway is used as the main entrance to the room, then before installing the stairs, it is important to make sure that two walls of brick or other material are laid out near the previously left hole in the wall, and they represent an ascent.
The resulting gentle descent, which vaguely resembles a corridor, will serve as the main entrance to the cellar. Stairs are recommended to be made of metal or concrete, while the door in most cases is wooden. The main thing— is to carefully treat the wooden door and the metal hinges on which it is fixed with protective solutions before the direct operation of the cellar. An antiseptic should also be applied to the tree. - Ventilation arrangement in the cellar. In order to avoid spoilage of products stored in the cellar, fresh air should constantly circulate inside the room. For this purpose, the installation of a ventilation system is carried out. The best option is to install two pipes (exhaust and supply), which will provide air circulation, and also help to avoid an excessive increase in humidity in the room.
Pipes of aboveground cellars are installed on different sections of the structure: the exhaust pipe is fixed from above, and the supply one — is fixed from below. If we are talking about buried structures, then in them both pipes are located in the upper part of the structure.
In addition to ventilation, a power supply system is installed in any cellar, which should be reliably protected from the effects of high humidity and low temperatures. For this purpose, all wires are wrapped with insulating materials (at least two layers), and artificial lighting sources are covered with special hoods and equipped with moisture protection systems. It is best to abandon the installation of sockets inside the cellar.
More materials on the topic:
- How to properly make the waterproofing of the basement from the outside
- Fungus and mold in the basement of a private house: Causes and how to get rid of it once and forever?
- Arrangement of the basement in the house: Construction technology and how to do everything right
- Garage waterproofing: how to do it correctly and what materials to work with
- Condensate in the basement. What to do and how to eliminate it once and forever
Video tutorial
Above, the main stages and features of the construction of cellars, both underground and not buried, were considered. However, in order to accurately do everything correctly, it is also recommended to refer to visual aids containing all the necessary information about the cellars and demonstrating all the stages of their construction.
In such manuals, you can also find recommendations for the selection and purchase of materials necessary for the construction of a turnkey cellar. Often unnecessary materials are consumed, for example, concrete mixes or bricks that were left after the construction of a private house or garage. Also, in most cases, littered wooden boards come in handy, which should first be given the necessary performance characteristics.
In the video guide below, you can see all the stages of the construction of the cellar. Viewing the video tutorial will help you not to make the most common mistakes.
Prices for the construction of a turnkey cellar
Many construction companies carry out the construction of turnkey cellars. As a rule, the verified organizations perform not only the direct installation of the premises but also the examination of the terrain, carrying out the necessary measurements and installing auxiliary elements that may be required during the construction process. In addition, the guarantee for the work performed provided by the companies helps to avoid many problems, such as, for example, damage to materials or other problems with the condition of the cellar. Let’s consider the prices for the construction of a turnkey cellar on several specific examples.
- A cellar with dimensions of 200*300 cm and height of 210 sm, equipped with a vertical manhole, as well as equipped with a ventilation system, hydro and thermal insulation, stairs, and protective compounds (mixtures based on bitumen or concrete), will cost customers of 70-80 thousand rubles. Such works include not only construction but also services for the use of special equipment and measurement work.
- A cellar of rectangular shape and dimensions specified in paragraph 1, also equipped with hydro, thermal insulation, and ventilation system and additionally equipped with a spiral staircase, semicircular concrete products, and a manhole cover slab, will be an excellent solution for any suburban area. The construction of such a cellar will cost customers of 120 thousand rubles.
It is best to organize the construction of a turnkey cellar, that is, to order a complex of works from a construction company at once, since it is much more convenient for many specialists to work with their equipment and with the help of measurements that were made before the start of construction by themselves.
If you disperse the workflow and, for example, order measurements from another organization or perform them by yourself, there may be a great risk that the cellar will not be performed as originally planned. Therefore, it is best to order the whole complex of construction works related to the arrangement of the cellar from one construction company.
Features of construction of a cellar under a house or garage
Underground cellars are often installed under a garage or house. In order to start their construction, it is necessary to destroy the floor directly above the future cellar, remove the debris of the material and dirt, and only then proceed to dig the pit. At the same time, it is very important not to touch the walls of the garage or house, and also to use props during operation. The dimensions of such a cellar due to its location are limited: it should be no deeper than 2 meters, and the length and width are determined in such a way that the walls of the garage or house remain intact during the excavation of the pit.
The best option for pouring the foundation will be concrete. Before concreting the finished pit, it is necessary to lay a layer of sand on the bottom and carefully tamper it so that its thickness is at least 15 sm. The second layer is filled with sand along with crushed stone, and the thickness of such a coating should be within 5 sm. Further, you can proceed with the installation of the reinforcing frame, but it can be abandoned if the soil has a sufficiently dense structure.
The concrete mixture is best mixed using a concrete mixer, and as an addition to the composition, a plasticizer can be added. The filling is carried out only after fixing the formwork and reinforcing the frame. At the same time, you should choose a corner in the cellar floor and make a small recess in it, which will be used to collect condensate. The walls of the underground cellar can be built of red-baked brick or stone. If the groundwater level is not too high, then you can stop on the walls of monolithic reinforced concrete. The plaster used to treat the walls of the room should necessarily contain water-repellent components.
Any underground cellar needs reliable waterproofing, since not only the floor but also the walls, as well as the ceiling of the cellar, somehow come into contact with rain and meltwater. As an external waterproofing, it is recommended to use roofing material— a waterproof and chemical-resistant material that fits in two layers with respect to overlap. Also, for the hydrophobic treatment of the cellar, a burlap soaked in a bitumen solution may be useful. Such material is not afraid of contact with the ground and with any substances contained in it, including liquids.
The entrance to such a cellar is best arranged right in the garage, and you need to make it in the form of a hatch. A staircase will go deep into the cellar, fixed with a minimum angle of inclination and passing along the entire length of the underground room. Ventilation in such a cellar can be natural or forced. In the first case, an excellent solution will be the installation of ventilation pipes, the length of which should be made equal to 2-5 meters. Such a pipe will allow you to get the necessary temperature difference, which will “start” the circulation of fresh air inside the cellar. At the same time, the end of the pipe that goes out is best equipped with a grate that will prevent dirt and pests from entering the room.
Forced ventilation pipes are most often made on the basis of plastic or cement, they are easy to be installed and maintained, if necessary, and they are also characterized by a fairly low cost. The forced ventilation system includes an electric fan, which provokes the movement of air inside the cellar. It is important to remember that all wires and other elements of the power supply system should be made in accordance with the requirements of waterproofing.
The ceiling of an underground cellar, which will simultaneously serve as the floor of a garage or a private house, should be equipped with reinforced concrete or metal beams. If desired, concrete slabs can also be installed, but this process can be quite expensive. If we talk not about turnkey construction, but about the work done with our own hands, we can recall that the formwork and reinforcing frame are an excellent basis for the cellar, and not only for its floor but also for the ceiling. At the same time, it is very important to make the ceiling so that it is directed at a slight angle directed towards the condensate collection zone.
As a heater for the cellar, polystyrene foam is most often used, characterized by biological and temperature resistance, as well as long service life. Experts recommend installing thermal insulation not only on the floor but also on the ceiling of the underground cellar. If you ignore this advice, you may face the problem of accumulation of a large amount of condensate, and consequently, a significant increase in humidity indoors. A good option for structures made of reinforced concrete is a false ceiling, which forms reliable thermal insulation for the cellar.
The underground cellar is necessarily equipped with artificial lighting, protection from moisture, and ventilation. As for the shelves for storing products, they can be installed on the floor or walls of the cellar. At the same time, you should not fill the cellar to the limit: it is better to leave some free space that may be necessary to store new products. It is important to understand that the construction of a cellar under an already equipped garage or house is much more difficult to organize than the construction of a storage facility for products at the construction stage of the main structure. Therefore, experts recommend thinking through all possible scenarios in advance and, if possible, starting the installation of an underground cellar as early as possible.
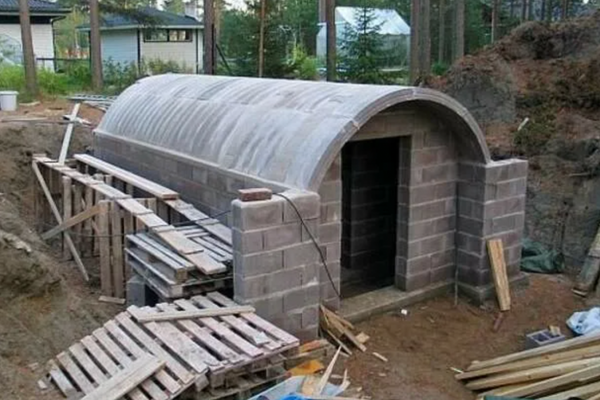
Features of cellar construction at high-ground waters
In cases where a sufficiently high groundwater level is characteristic of a particular area, the optimal solution will be the construction of a turnkey, not underground, but semi-buried cellar. In this case, how is construction and installation work carried out?
- First of all, the top layer of turf is removed from the surface of the ground (which may be useful upon completion of the cellar arrangement), after which a small pit is dug, the depth of which is no more than 1 meter.
- The bottom of the resulting pit is leveled, after which is filled with a packed layer of sand, and then with the same layer of crushed stone. The thickness of the sand layer should be 5-7 cm less than the crushed stone layer.
- A reinforcing frame is installed on top of the rubble layer, and the formwork is also mounted. A layer of concrete is poured inside the resulting structure, the thickness of which should be at least 8 cm.
- It is possible to start further work with the floor only after the concrete coating has completely dried, and it should be understood that the wait may take up to several weeks. After the foundation dries, the floor of the semi-buried cellar is equipped with waterproofing and cement screed.
- The walls of such a cellar are recommended to be made of brick, carefully working out the joints between the elements of brickwork. The height of the walls should not be more than two meters. The ceiling for such a cellar is installed as monolithic.
- Polystyrene is used to insulate the walls from the outside of the cellar, with which vertical surfaces are sheathed.
- After the installation of all the main elements of the cellar, additional waterproofing with roll-type materials can be installed.
- The resulting cellar is lined on all sides with ground and turf collected at the very beginning of the working process. Only the entrance to the room remains free from filling with the ground. If desired, you can decorate the structure with grass, flowers, or other plants.
Read more about how to protect the structure from groundwater:
- Waterproofing from groundwater inside and outside the house
- Waterproofing of the cellar: How to make it correctly from the inside and outside and what materials to use for this in the presence and absence of groundwater
Features of the construction of a wine cellar
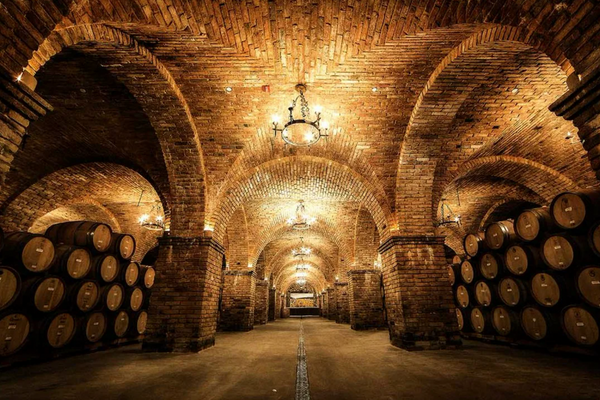
Often, wine cellars are built on the territory of private houses, which greatly simplifies the life of connoisseurs of such a drink. For a wine cellar, it is extremely important to choose the right construction site, as well as take into account all the recommendations of specialists in this regard. Most often, wine cellars are built in basement and semi-basement rooms, in aboveground or semi-buried buildings, adjacent to the house, as well as in structures remote from the house.
There are certain requirements for wine cellars:
- The optimal area for a wine cellar is — from 10 to 12 square meters.
- The walls of such cellars are made of brick, wood, stone, or tiles that perform a decorative function. If wood was chosen as the main material for the walls, then it is worth stopping at rocks that do not have a pronounced smell (for example, oak). At the same time, all wooden surfaces should be treated with protective solutions.
- Wine cellars are equipped with hydro and thermal insulation, while the minimum allowable thickness of the thermal insulation layer is 15 sm. An excellent solution would be the use of expanded polystyrene or foam resin, as well as foam plastic familiar to everyone.
- The entrance door in such a cellar should be insulated and installed as low as possible. This is necessary in order to get as little air as possible into the room, which can lower the temperature in the cellar to critical values.
- The floor in the wine cellar, as well as the walls, can be made of various materials. Sand, stone, or brick are perfect for this purpose. In such rooms, condensation is often accumulated on the ceiling, which can also harm the condition of the floor. Therefore, experts recommend giving preference to a floor made of sand, which is contributed to the formation of an optimal microclimate in the room.
- Tiles made of ceramics, marble, stone, boards made of various materials, or fine gravel are used as finishing materials for the floor. Concrete floors are not alien to wine cellars, but there is an urgent need for the installation of such floors only in cases when the soil is characterized by high humidity, and the groundwater level in it is high enough.
Features of the construction of ground cellars
The construction of turnkey ground cellars implies the construction of structures completely located on the surface of the ground. At the same time, among the variants of ground cellars, there are free-standing and wall-mounted structures.
In the second case, the basis for the construction of the cellar is the wall of an already installed structure, such as, for example, a private house, garage, or bathhouse. Both types of ground cellars are characterized by compactness, protection from flooding, and high functionality. However, at the same time, they also have their drawbacks, among which — are the violation of the landscape of the territory, the difficulties that arise at the stage of installation of waterproofing, as well as the exactingness of cellars to the regularity of cleaning and disinfection.
There are several types of ground cellars.
- The first of them — is a standard cellar with a boning, externally resembling a small hut built of planks and logs. Logs whose diameter does not exceed 25 cm are used for their construction, and they should first be covered with bitumen mortar. This will help to significantly increase the service life of the storage. Such logs are fixed in the ground, and their upper parts are connected to each other, forming the basis for the lathing.
Then the lathing itself is mounted, and on top of it— is a roofing material that protects the structure from moisture. In some cases, thermal insulation is also installed, which is also based on the roofing material. A curtain should be installed over the entrance door, and a ditch should be built along the perimeter, which will protect the ground cellar from rain and meltwater. A standard lab is necessarily equipped with ventilation. The service life of the storage, installed in compliance with all the rules, is 10-12 years. At the same time, the dimensions of such a cellar are only 4*8 meters. - The second version of the ground storage — a cellar without boning — is installed in a small recess with a depth of 50 to 60 sm. As a cushion that performs a drainage function, expanded clay, gravel, or coarse sand is used, and a layer of clay with a thickness of 10 to 12 sm is laid out on top of the drainage. Bricks are installed in the layer of clay, from which the walls of the building are also erected.
Another option for the construction of walls is boards suitable for the arrangement of the ceiling. At the same time, it is important to lay a layer of insulation at the joints of the boards with each other. Standard roofing material is used as waterproofing, and the roof is made of the same roofing material or slate. Along the perimeter, the cellar is also equipped with a ditch that prevents flooding of the warehouse. - The last option of a ground cellar — wall storage — helps to significantly save space on the site and not spend a lot of money at the same time. The walls of such storage are most often laid out of brick or concrete, and the outer surfaces of the walls are necessarily treated with a bitumen-based mixture. It is also recommended to make the floor with concrete.
After the concrete has completely solidified, you can start building a roof using clay, a humpback, and two layers of roofing material. A small ditch dug around the perimeter of the building is also responsible for the drainage system.
After that the matter remains for small — it is necessary to arrange the cellar from the outside and equip it with shelves for storage inside. If you follow all the recommendations of experts, you can build a reliable cellar that will perform its functions for many years.