Table of Contents
- Why it is necessary to do the waterproofing the floor
- How to make the floor in the basement correctly – the installation of a multi-layer floor taking into account waterproofing
- Methods and technologies of waterproofing the floor in the basement area
- Materials for waterproofing the basement floor
- Waterproofing of the basement floor from the inside when leaks are detected
- Waterproofing the basement floor from the inside with your own hands: Recommendations and step-by-step instructions
The basement of a house or building is usually located underground below ground level, which means that it is subject to constant exposure to water and moisture in the ground. This circumstance obliges builders of private houses and commercial buildings to approach the issue of waterproofing the foundation, walls, and basement floor with special attention and professionalism.
Why it is necessary to do the waterproofing the floor
Since there is ground – soil under almost any basement, this soil, even in the absence of high groundwater, absorbs moisture and gives it back to the concrete from which the slab or floor of your basement is made. In the absence of good waterproofing of the made floor, moisture is absorbed into the concrete base of your floor and then manifests itself on the floor screeds in the form of a wet spot or puddle.
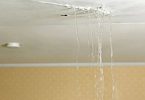
In the presence of high groundwater, if there is no waterproofing of the existing floor, the basement may simply flood, since the floor is not protected and nothing prevents it.
The lack of high-quality waterproofing of the made floor can lead to the following consequences:
- Leaks and flooding;
- The formation of cracks on the floor;
- Constant wetting of the floor will eventually lead to increased humidity, dampness, and the formation of mold and mildew on the walls and on the floor.


How to make the floor in the basement correctly – the installation of a multi-layer floor taking into account waterproofing
If we are talking about a slab foundation and your house has already been built, then the layers of your floor will look like this:
- Foundation slab
- Fillet on the transition from the horizon to the vertical
- Waterproofing on the slab with access to the walls
- Screed made of cement-sand mixture
- Finishing with tiles, parquet, etc…
If you don’t have a floor in your basement yet, or rather a base plate, then the correct layers of your floor should look like this:
- Compacted soil
- Compacted sand and crushed stone base
- Geotextile
- Concrete base
- Waterproofing
- Geotextile
- Reinforced concrete slab
- Fillet on the transition from the horizon to the vertical
- Waterproofing on the slab with access to the walls
- Screed made of cement-sand mixture
- Finishing
Diagram of all floor layers:

Important points in the installation of the basement floor and its waterproofing:
- Concrete base – Be sure to make the concrete base, since to prevent liquid from entering the floor, waterproofing should be done before the base slab. Moreover, in order to work effectively, any waterproofing coating should be laid on a rigid base, and not on soil, crushed stone, or expanded polystyrene.
- Reinforcement of the slab – When arranging the floor, be sure to reinforce the slab, otherwise, it may crack over time from the effects of groundwater, temperature drop, soil heaving, or house dynamics.
- Bentonite profile – When you pour the slab at the joint of the slab wall, a cold seam is formed. A cold seam— is the weakest point in any construction and it is he who will begin to let water pass through in the first place. To prevent its penetration and lifting of capillary moisture through this seam, it is recommended to install a so-called bentonite profile or a swelling cord around the perimeter of the poured slab.
- Pouring reinforced concrete slab– When pouring, it is recommended to add special hydrophobic additives to the concrete to improve the resistance of concrete to liquid.
- Fillet – Before installing waterproofing on a flooded slab, it is necessary to make a so-called fillet or a small skirting board from Cement-Sand Screed or a non-shrinkable composition at the junction of the slab wall. The fillet is needed so that when the waterproofing coating passes from the horizon to the vertical, there are no 90 degrees since an angle of 90 degrees is a weak point that can damage the integrity of the insulation in the process.
- Waterproofing – Be sure to make 2 waterproofing contours, one on the concrete base, and the second one on the slab. Waterproofing coating is always applied to the base slab, after which the screed is already underway. Waterproofing should be raised on the walls by at least 20 sm.
If we are talking about the arrangement of the basement floor, taking into account it is deepening, then you can read more about the technology of deepening the basement in the article – “How to make correctly a basement deepening below the sole of the foundation“.
Methods and technologies of waterproofing the floor in the basement area
Today there are quite a lot of methods to protect your floor from the inside from the passage of ground and other water into the basement through it.
Choosing the right method depends on several factors:
- Waterproofing stage – Whether waterproofing is done at the construction stage or at the operation stage as a repair and elimination of existing leaks.
- Base – What the base is made of, on which the insulation will be applied – brick, concrete, FBS blocks, etc…
- Surface condition – In what condition is the surface on which the waterproofing coating will be applied.
- Groundwater – Whether there is high groundwater under or around the house.
Important: To determine correctly how and with what to perform waterproofing of your floor, it is recommended to call an experienced waterproofing engineer. It is such an engineer, who, after examining your project, will be able to give the necessary recommendations. The main methods and types of waterproofing:
The main methods and types of waterproofing:
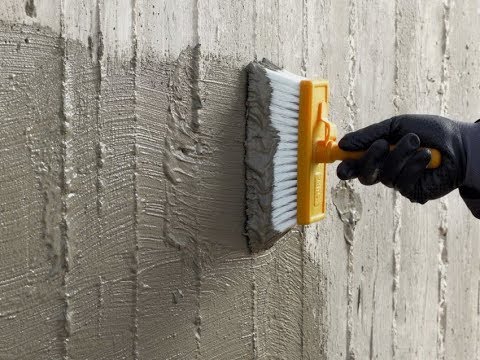
- Coating – Various mastics and mixtures are applied by a coating using tools such as a spatula, brush, or construction roller. The result is a homogeneous membrane with full adhesion to the base.
- Application of liquid rubber – Liquid rubber can be sprayed using a cold airless spraying unit. As a result, a reliable insulation membrane is formed without seams, with 100% of adhesion to the base and a high percentage of flexibility.
- Penetrating – When a concrete wall or slab is abundantly moistened, this insulation penetrates into the concrete structure and forms a waterproofing barrier.
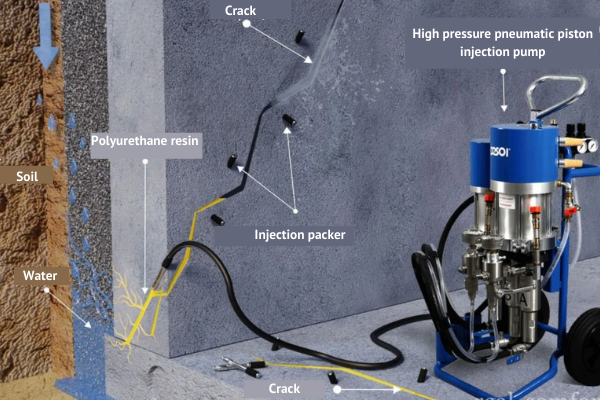
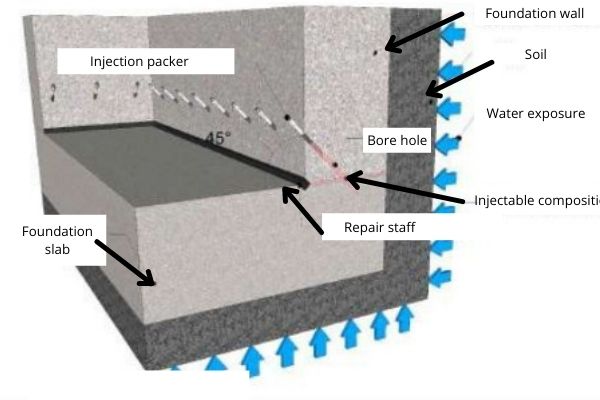
- Injection waterproofing – Injection polymers are supplied under pressure through a pump, through special packers (injection tubes) into the inside of concrete or other substance. Due to the strong pressure, the injection spreads in all voids, displacing moisture from there. Thus, the injection does not allow the water to pass. Injection technology is considered one of the most effective methods of combating leaks from the inside.
- Membrane – Special PVC membranes are mounted on the floor or walls. The seams formed between them are sewn together with the help of hot air.
- Roll pasting– Mounted with a hot fire. In fact, the bitumen membrane is deposited on the foundation or floor. These membranes are deposited in 2 or 3 layers, overlapping the formed seams of the previous one.
- Polymer cement – Special waterproofing mixtures designed to perform insulation both from the outside and from the inside. Polymer-cement mixtures can be sprayed using equipment or applied manually.
The floor insulation can be performed from the inside, from a surfaced PVC membrane installed in 2 layers, or from mineral cement, polyurethane, and other waterproofing compounds.
If bitumen mastics, PVC membranes, and other similar materials are used as insulation, then you definitely need to press them with something, for example, a screed. If the waterproofing coating of the floor goes as a finish, then it is recommended to use compositions that work on negative water pressure, for example, polymer-cement acrylic waterproofing HydroPaz Prime.
Materials for waterproofing the basement floor
To protect the floor of an underground structure from future and present leaks, various materials with different characteristics can be used.
Main types:
- Coating
- Liquid rubber
- Penetrating
- Injection
- Membrane
- Rolled


The choice of a suitable material depends on its characteristics, your budget, and the complexity of the work.
Waterproofing with coating materials
One of the most common methods of waterproofing is the application of various coating substances to the surface. Today there are quite a lot of different coating mastics, differing in internal components, principles of operation, quality and warranty period. Most of the coating materials can be applied both from the inside and outside of the basement, however, if you apply a certain mastic from the inside, then be sure to pay attention to the fact that not all coating polymers work on the negative pressure of the liquid from the outside to the inside, such mastics should be pressed otherwise they will simply move away from the base under pressure.
The main types of coating waterproofing:
- Bitumen-based – Bitumen is used as the main component. This type of mastic is the most popular, it can be applied to the surface both from the inside and outside. Bitumen compositions are applied in several layers using a roller and brush. Bitumen does not withstand negative moisture pressure.
- Cement-based – Polymer-cement mixtures in which the main component is cement with various polymer additives. These materials can be both single-component and double-component. Some compositions can withstand negative water pressure, which is an undoubted advantage when performing work from inside the room. Polymer-cement mixtures are supplied in buckets in the form of cement powder, then they are mixed in a certain proportion with water or with the second component. Polymer cement can be applied using a brush or roller.
- Polymer and polyurethane mastics – These mastics are also applied with a roller. They cannot withstand the pressure of moisture from the outside and, accordingly, require the installation of a clamping screed or wall. Polyurethane mastics can be single-component or double-component.
Application technology:
In order for the coating insulation work effectively, it is necessary to observe the following technology of its application:
- Surface preparation – The surface should be thoroughly cleaned of dirt and dust.
- Drying – Before applying bitumen, polymer and polyurethane mastics, the surface should be dried, since they do not lie on a wet base.
- Primer – Before applying the coating insulation, the base should first be primed with a special primer. The primer improves the adhesion of the material to the surface. Each mastic has its own primer that best suits it.
- Preparation of the material – It is necessary to thoroughly mix the selected mastic and, if necessary, ass other components to it, following the manufacturer’s instructions.
- Application – When performing work, it is necessary to follow strictly the manufacturer’s instructions. Mastics are best applied in 2-3 layers with the drying of the previous one.
Advantages:
- No seams
- 100% adhesion to the base
- Non-firing mounting method
- Does not require special equipment
Liquid rubber
Waterproofing with liquid rubber is considered one of the most reliable methods of waterproofing. Liquid rubber can be either single-component or double-component. Liquid rubber is sprayed with the help of equipment or applied manually in small volumes. The material is suitable for external use as waterproofing of concrete, brick, and other foundations, as well as for interior work.
Advantages:
- From 600% of elasticity
- No seams
- Full adhesion
- When spraying, it is possible to cover an area of 400-600m2 per 1 day
- Resistance to mechanical damage
- Eco-friendly
You can read more about this type of waterproofing in the article – “Waterproofing with liquid rubber“.

Penetrating waterproofing
Materials with a penetrating effect penetrate into the structure, forming an invisible protective film. These mixtures are supplied in powder form and require constant moistening of the substrate before and after application. Unfortunately, these mixtures will not work if the concrete is not in the best condition (that happens quite often).
You can read more about penetrating waterproofing in the article – “Penetrating waterproofing: A detailed description of its work on concrete, types of materials and application technologies“.
Injection
Injection insulation is designed in most cases to eliminate leaks from the inside. These materials are ideal for solving water problems for many years to come.
The main types of injection:
- Polyurethane resins
- Helium resins

You can read more about this method in the article– Injection waterproofing.
Membrane and roll waterproofing
Most roll materials are used for external insulation. It makes no sense to mount them from the inside without a clamping structure. The main advantage of these membranes is a relatively low price. However, do not forget about their main disadvantages, namely, the presence of seams and the complete lack of adhesion to the base. These disadvantages often lead to the fact that after a year of two the waterproofing coating ceases to work effectively and begins to pass water.
You can read more about roll and membrane waterproofing in the following articles:
- Roll waterproofing installation with detailed installation instructions
- Membrane waterproofing: Types of materials and methods of their arrangement
Comparison table of characteristics of different materials
The following table compares the main types of the waterproofing systems:
| Liquid rubber | Bitumen | Polymer-cement | Surfaced membrane on a bitumen basis | PVC membrane | |
| Mounting method | Non firing | Non firing | Non firing | Firing with the burner | With the help of dryer and mechanical fixation |
| Seams availability | Not available | Not available | Not available | Available | Available |
| Adhesion to the base | 100 % | 100 % | 100 % | 40 % | No adhesion |
| Coefficient of elasticity | 600-800% | 10-100% | 10-300% | 10-20% | 10-20% |
| Installation speed m2/ per 1 day | 400-600 | 50-60 | 50-60 | 20-50 | 30-60 |
| Work on separation | Not available | Not available | Available | Not available | Not available |
| Warranty period for works | 7 years | 5 years | 7 years | 3-5 years | 1-2 year |
Waterproofing of the basement floor from the inside when leaks are detected
If wet spots or leaks are detected in the basement, you need to eliminate them immediately, otherwise you risk deterioration of your building.
To eliminate the identified defects, it is best to use the injection method, since it is this method of protection that can guarantee the capital and long-lasting protection of your structure, if it is impossible to restore the waterproofing from the outside. However, do not forget that this technology works best in combination with other protective measures, such as sealing joints, pipe entry points and cracks.
Injection technology is suitable to eliminate the following problems:
- Waterproofing of concreting joints
- Waterproofing of pipe passages
- Waterproofing of cracks
- Insulation of the problem areas on the floor
Waterproofing the basement floor from the inside with your own hands: Recommendations and step-by-step instructions
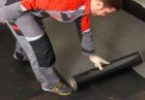
Step 1-Preparation of the floor surface.
Prepare the socle for the waterproofing process. Dismantle the finishing elements, such as tiles and screed, in order to reach the base of the slab. Sweep it clean to see the holes in the floor surface. Use a wire brush to clean the sides of the cracks. This also removes loose concrete, which you can remove using a wet/dry vacuum.
Step 2-Eliminate cracks.
In order to perform effectively the waterproofing of the basement, all the cracks in the foundation should be patched, since any crack can be an access point for ground water. Cracks are sealed by stitching them, and then layer-by-layer sealing, a special expanding sealant. If the concrete is damaged, it can be additionally injected with a polyurethane composition of the HydroInject type, at the crack formation site in the floor. This composition penetrates into the voids and cavities of concrete, displacing moisture from there and enhancing water resistance.
You can read more about sealing cracks in the article – “Waterproofing and sealing cracks in concrete, brick and other bases“.
Step 3-Cold seams and floor – wall joints.
The edges of the concrete basement floor tend to separate from the walls (in older houses). When erecting a building, the slab is first filled in, and then walls are erected. So the abutments of the slab wall, or rather the seams of the abutment of the floor – wall, are the weakest points in the basement design. In order to protect your basement as well as possible, it is recommended to make a so-called cut-off waterproofing:
- The seams are unstitched, namely, a 3х2sm indenting is made, in the shape of a swallow.
- A special non-shrink compound, according to the type of HydroExpand, is compacted in layers in the indenting.
- Then, holes are drilled in a staggered order, injectors (packers) are installed in them.
- Through pumping equipment, an injection compound of the HydroInject type is injected into the installed packers. This composition spreads in all voids of concrete, squeezes out existing moisture, makes concrete waterproof, and also creates a cut-off, preventing moisture from under the floor to climb the walls.
You can read more about the waterproofing of joints in the article – “Sealing and waterproofing of joints – concrete, cold and deformation“.


Step 4– Applying insulation to the walls.
The last step in waterproofing your concrete floors is– to apply insulation to the basement floor with a rise on the walls to the level of the end of the ground. As a waterproofing system, it is recommended to use materials that withstand negative moisture pressure. The most suitable for this —is the line of waterproofing systems of BASF plant or polymer cement waterproofing HydroPaz from the company HYDRO. It is HYDRO materials, that are used by most large companies whose specialization is waterproofing work.
You can read more about cement waterproofing in the article – “Cement-based waterproofingе: Features, types and methods of its application“

Important: When it comes to waterproofing, it is important to understand that the ideal way to protect against penetration and exposure to water is to eliminate the very cause of its occurrence, namely due to the lack of proper waterproofing from the outside of your structure. Accordingly, the ideal design solution is to protect the walls of your building from the outside, with the installation of a drainage system located below the level of the foundation slab, so that this system can take not only the water that approaches the house from the side, but also the one that is under it.