Table of Contents
- What is a pitched roof?
- Types of pitched roofs and their features
- Calculation of a pitched roof: How to calculate all structures correctly
-
Installation of pitched roof: Step-by-step instructions
- Installation of curb plate
- The installation of the rafters to the curb plate
- Installation of rafters for the construction of a load-bearing wall
- The installation of reinforcement units for the rafter structure
- Fastening of rafters to the girder
- The installation of the lathing and counter-lathing
- Waterproofing of pitched roof
- Ventilation of the roofing layers
- Installation of pitched roof
- Installation of the final coating
- Drain
- Prices for the installation of a pitched roof
- Repair of pitched roof
- Design of pitched roof
- Pitched roof installation services
In modern construction, the use of a pitched roof is common, combining a large number of structures. Each of them has its own features and unique installation technologies, but there are also common features that unite all pitched roofs. In this article we will talk about what types of pitched roofing there are, as well as what technologies of installation of pitched roofs are used for the arrangement of roofs?
What is a pitched roof?
Pitched roof — is one of the types of roof, the main competitor of which is a flat roof. They differ in the slope angle, which for flat roofs varies from 1 to 5 degrees, and for pitched roofs is in the range from 5 to 90 degrees. The main feature of the second type of roofs is their huge variety in comparison with flat coverings, the structure of which, as a rule, is represented by a single slope.
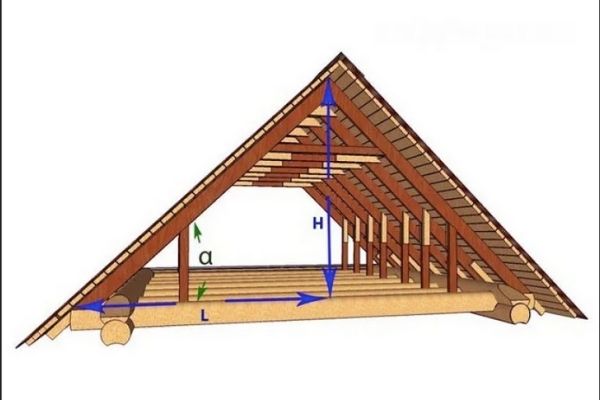
What is a stingray? This is the slope of the roof of the house, which is intended for the flow of meltwater and rainwater. In private homes, there is a different number, slope and arrangement of ramps, but the standard option is to install one or more ramps with an angle of inclination from 15 to 45 degrees. All the structural features of the roof in question are determined by the format of the supporting truss system, which is often made, for example, of wooden beams.
Currently, there are a large number of types of pitched roofs, including:
- Single-pitched;
- Multi-pitched;
- Hip;
- Tent;
- Attic;
- Vaulted;
- And some others.
More details about each of them will be discussed a little later. It is important to understand that the choice in favor of a particular roof is based on the wishes of the design, functionality, as well as the performance characteristics of the roof.
The basis of the pitched roof structure — is a rafter system. However, in addition to the rafters, the following components are usually included in the construction of a pitched roof:
- Curb plate
- Lathing
- Ventilation of the roof space
- Insulation
- Waterproofing
- Finishing roofing
These components of most pitched structures characterize almost all types of pitched roofs.


Also depending on the external and internal structure of the oof, a decision is made on the arrangement of the space located under the roof. Often attic rooms are adapted for a pantry or even a full-fledged room. However, in this case, it is necessary to carry out additional measures to insulate the roof.
When insulating pitched roofs, you can use a wide variety of materials used for the design of the finishing roofing. Among such materials are:
- Metal tiles;
- Soft shingles;
- Ceramic tiles;
- Metal;
- and other coatings.
For each of them, positive and negative characteristics can be named, which do not always depend on the cost of the material.


Advantages and disadvantages of pitched roofs
What are the advantages of a pitched roof, for example, over a flat roof, and what are its negative characteristics highlighted by experts in the field of construction?
Let’s start with the positive properties of a pitched roof.
Advantages:
- Firstly, such a coating, as already mentioned, provides rapid runoff of both rainwater and thawed water from the roof space. This effect is achieved due to the large scope of the slope, which is several times higher than the slope of a flat roof.
- Secondly, access to most elements of the construction of a pitched roof can be obtained from inside the room. This significantly facilitates the maintenance and troubleshooting process in the roof and under-roof space.
- Thirdly, pitched roofs are practically created so that an attic floor can be easily organized in the attic. Moreover, the arrangement of the attic room does not even require the construction of external walls, as in the case of flat structures.
- And the last, but by no means unimportant advantage of pitched roofs is possibility of transforming a pitched roof into a flat one, if such a desire arises.
Disadvantages:
- If we talk about the disadvantages of a pitched roof, then it is impossible not to mention rather high cost of such structures, since a rafter system is required for their installation.
- Another negative point is the need, and not always justified, to use more expensive roofing materials. This is due to the fact that pitched roof is part of the facade.
- The disadvantages include the need (not in all cases) the requirement to clean the roof surface from snow only mechanically, as well as the inability to constantly monitor the condition of the roof and the under-roof space. For this purpose, as a rule, professional diagnostics are ordered from a construction company at least once every six months.
Types of pitched roofs and their features
The roof in question can be absolutely diverse, for example, include one or more ramps. Single-component sloping roofs are characterized by ease of installation, therefore they often cover non-residential premises (summerhouses sheds, greenhouses, baths, garages) and private houses with a small number of rooms. The angle of inclination of the roof at the same time is no more than 30 degrees. However, there are more complex forms of roofing, which are much more difficult to equip. Further, consider the types of pitched roofs that are distinguished in modern construction.
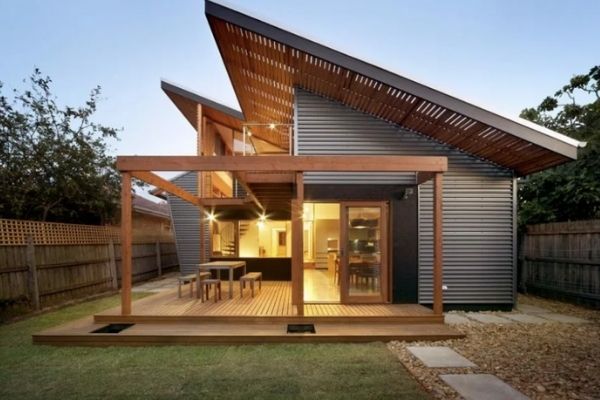
Single-pitched roof
The simplest roof, which includes only one ramp, is considered a single-pitched roof. Its design consists of three elements: a truss system, a crate and the roofing material itself. In some cases, the construction of single-pitched roofs requires the installation of other elements, for example, additional external walls. Then the rafter legs are reinforced on two walls having different heights.
Among the single-pitched roofs, one can distinguish another option, the so-called farms, which are characterized by a triangular shape. Such structures are assembled on the ground and raised to the roof, where they are fixed in compliance with a certain step. However, even farms are unable to surpass other types of pitched roofs in complexity.
The scheme of the installation of a lean-to roof

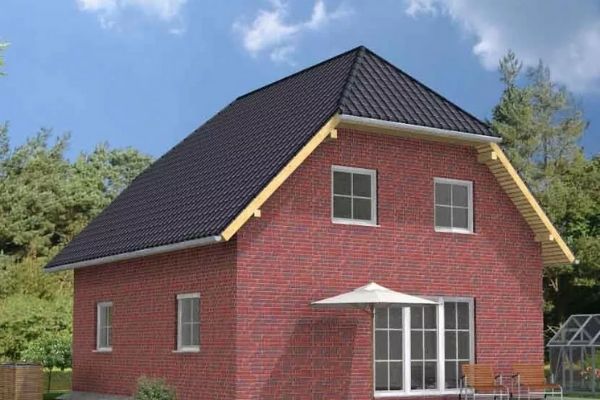
Gable roof
Gable roofs are characterized by the presence of two ramps. At the top point of the coating, these slopes are connected, thereby forming a roof ridge. Currently, symmetrical and asymmetrical gable roofs are distinguished, which differ in the nature of the slopes.
In the first case, the ramps are absolutely the same, both in area and size, and in the second case, they are different and arranged asymmetrically. The second type of ramp is characterized by the non-central location of the roof ridge. However, it is believed that symmetrical roofs are significantly superior in reliability to asymmetric ones, so the first option is used much more often.
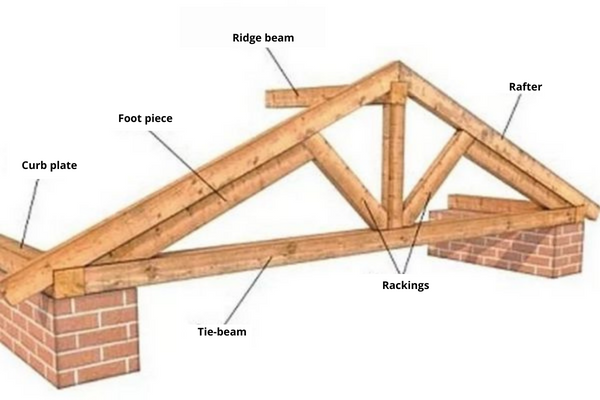
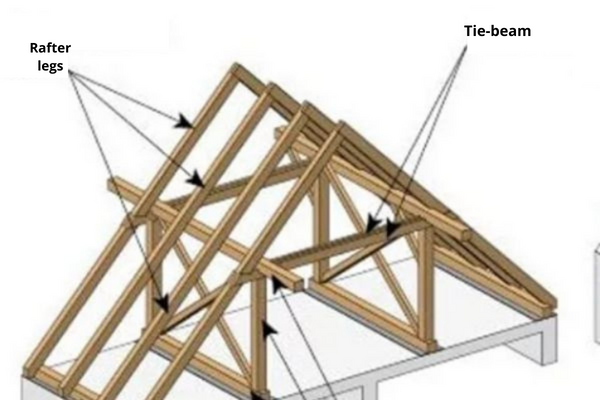
Unlike single-patched roofs, which include only three components, gable structures have a rather complex structure. They include:
- Rafter system: gable roofs are installed on beams representing the rafter system of the house. There are two types of rafters — slatted, that is, leaning on each other, and hanging, the basis for fixing which is a ridge run.
- Curb plate: this element consists of beams that are fixed to the walls of the house from the outside. It is on these beams that the entire rafter system relies on. The curb plate helps to distribute evenly the load on the walls, which is formed by a heavy truss system.
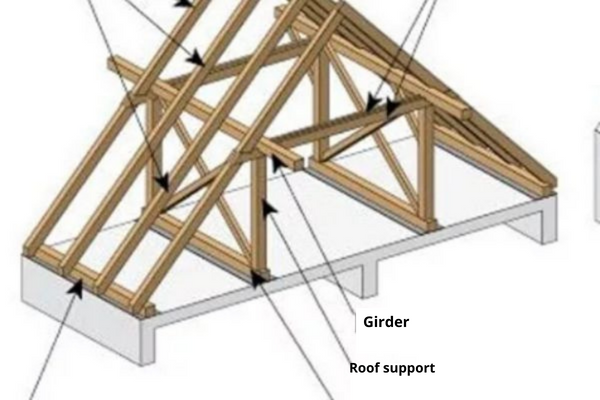
- Ridge beam: the following structure is positioned horizontally and forms a roof ridge. The girder is traditionally fixed on the roof as the highest part of it. Under this element, racks are mounted, and necessarily evenly, and the beam rests on them.
- Support racks: it is on these racks that the ridge beam rests, and from below they rest on the bench. The installation of racks requires the determination of a constant step observed between every two racks. This indicator is calculated based on the number and intensity of loads to which the gable roof is planned to be subjected.
- Intermediate girder: an additional girder made of timber, located across the truss system, reduces the number of additional support posts. After installing an additional beam, the emphasis on the racks is carried out on it.
- Intermediate supports: in cases, where the length of the rafter legs exceeds a value of approximately 4 and a half meters, an intermediate support post is additionally installed under each of the legs, and necessarily at a distance of half the span of the ramp. It is necessary to lay an intermediate bench under additional racks.
- Sill beam: a horizontal bar, called a sill beam, is usually installed parallel to the ridge beam. The upper and lower edge of it rests against two opposite walls of the house. Sometimes the sill beam can be laid on a load-bearing wall dividing the building into two halves.
That is, a gable roof is two flat slopes that are connected to each other at the top of the roof at a certain angle, usually varying from 15 to 45 degrees. The sides of the structure are adjacent to the pediment, assembled from bricks, boards, blocks, or other materials.
The scheme of the arrangement of a gable roof

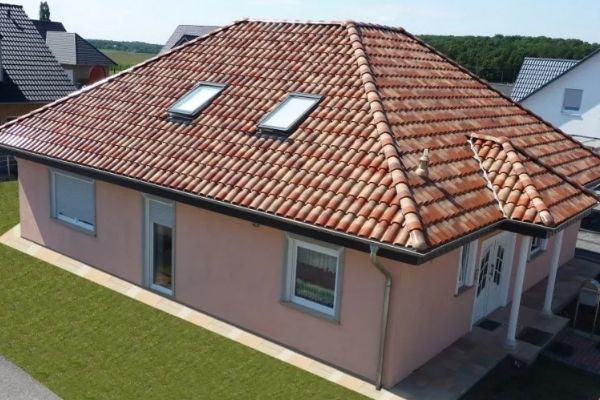
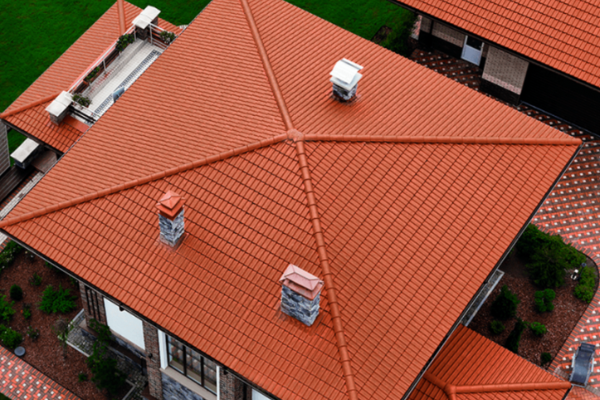
Hip roof
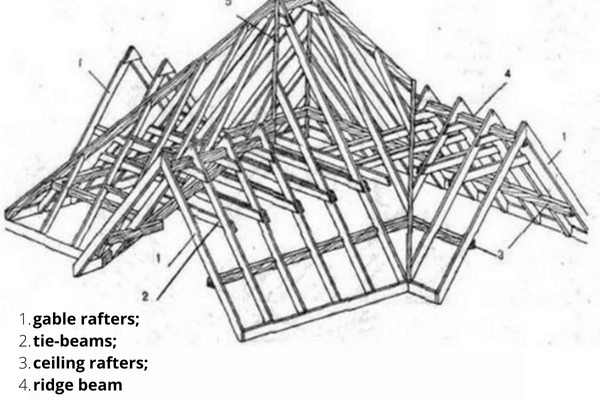
The following type of pitched roof, namely hip structures, is considered an extremely original solution for any private house. Such roofs include four slopes, two of which are located opposite each other, and their connection has the shape of a trapeze. The remaining two slopes are set in the shape of a triangle.
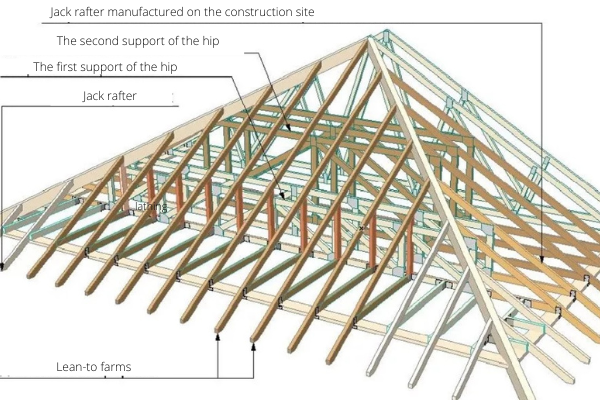
The design of hip roofs is characterized by the presence of rafter legs that differ from each other in length, from such a roof and is not similar to single-and gable versions. Also, hip roofs include additional rafters belonging to the diagonal or oblique subspecies. They are designed to separate adjacent slopes from each other. Such rafters serve as a link between the corners of the structure and the end of the ridge beam, and they themselves lean on support posts called strut frames.
The rafter system in the case of hip roofs consists of two types of rafter legs, which are divided into rafters and jack rafters. The short ones rest against the ridge beam, and the long ones— rest against the bevel beams. The number of short rafter legs or jack rafters is greater, the smaller the angle of inclination of the roof and the length of the girder.
Diagram of the hip roof installation

Half-hipped model
Half-hipped roofs are a type of hip structure, which is distinguished by a presence of a pediment on the slopes. It originates from the roof ridge or from the cornice. In connection with this structure, the ramps take not a triangular, but a trapezoidal shape. However, such a change in shape is relevant only if the pediment is connected to the ridge. If the pediment starts from the cornice, then the slopes retain the traditional triangular shape.
The type of roof in question is no more difficult to install than a gable roof. This design differs from the standard options only in that the two large ramps expand somewhat in their lower part. However, some connections of roof elements still require the use of additional tools.
Characteristic of the half-hipped models, the pediments are supported by side ramps having a trapezoidal shape, in connection with which, before installing the roof, the entire structure of a private house is reinforced. It is necessary to take into account the area of the ramps: if it is a large one, then the joint is made up of a beam with a cross-section of at least 10х10 sm, if the area is small, then the standard thrust board is used, which is fixed to the pediment supports.
Installation scheme of a half-hipped structure

Tent-shaped roof
Hipped roofs include four slopes and a ridge node, unlike other types of roofs, which are characterized by a ridge run. A node is called a connection of four rafters, which serve as the basis for four identical ramps, which are isosceles triangles in shape.
There are two subtypes of tent structures – hanging and slatted rafters. In the first case, the rafters are connected at the top of the roof and rest against each other. The layered type of structure also implies the use of an additional beam as support, installed vertically. The second type of hipped roofs is most relevant in the case of large-area and massive roofing.
Tent structures are not too often used in the construction of private houses. Their use is much more popular in the arrangement of non-residential buildings with a square shape, for example, garages, gazebos, summerhouses, baths, and so on.
The installation scheme of a tent roof
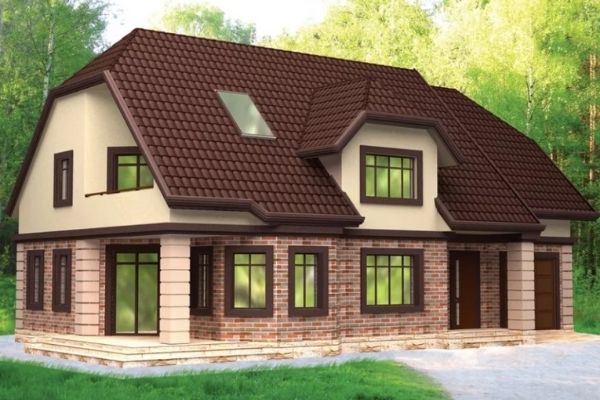
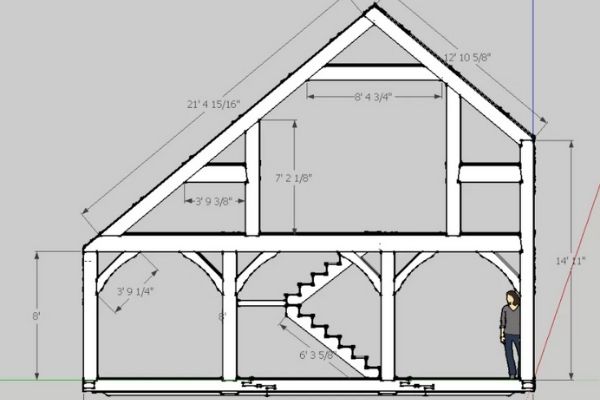
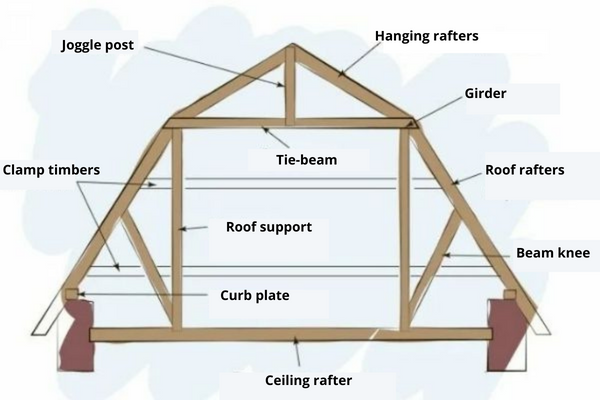
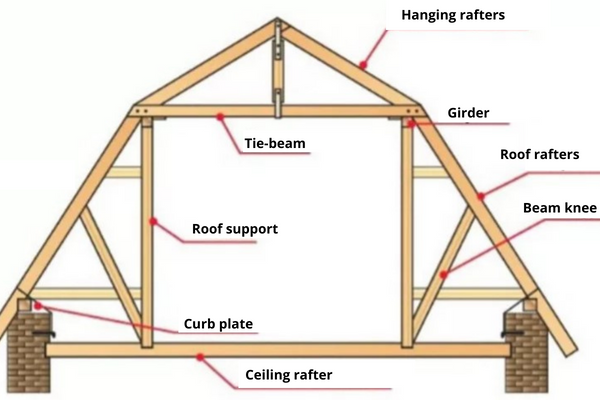
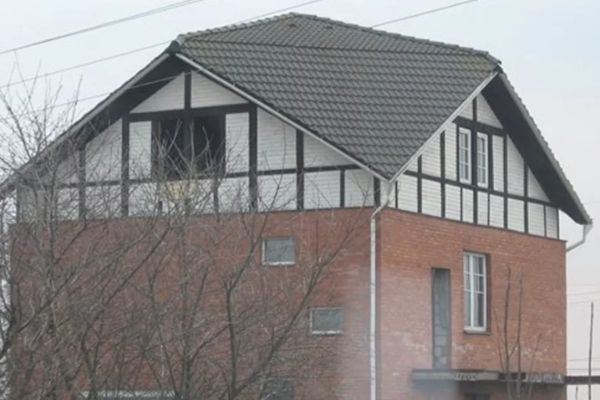
Mansard roof
Mansard roofs – are those structures that can be called complex. They include only two ramps, but each ramp consists of two parts inclined to each other at an angle. At the same time, the upper part of the structure is characterized by a greater steepness than the lower one. It is quite difficult to install and equip mansard roofs, so it would be best to entrust this matter to professionals, fitted with special equipment.
Two technologies are used for the construction of attic structures:
- In situations, where a mansard roof is required for a small private house or other not too extensive structure, the entire structure is assembled in a certain sequence. First, the support posts are fixed, on which the bindings are installed, and the posts along the pediment are erected on the curb plate, and under the slopes, they rest on the sill beams.
Strapping also becomes the basis for installing the rafters of the upper part of the roof. These rafters are divided into two types: slatted and hanging. After mounting the upper part of the rafter, the lower part of the system is fixed, each element of which is connected to the strapping (top) and to the curb plate (bottom). - If the mansard roof is planned to be installed on a large house, which is characterized by large spans, then the structure is assembled in parts. Such parts are called farms and are made on the surface of the earth, after each they are raised to the roof in a ready-made form. It is almost impossible to assemble the mansard roof of a large house of the elements.
Important: It is extremely important to understand than the attic room can be considered residential. For this reason, it is important to take care not only of high-quality insulation of the roof, but also of observing the proportions necessary for the arrangement of the living space. The angle of inclination of the attic structure should vary fromт 30 to 60 degrees, and also the optimal height should be observed for the room.
The attic room can be equipped not only in the case of mansard roofs. Gable, hip, and half-hipped designs are also suitable for this.
Installation scheme of the mansard roof
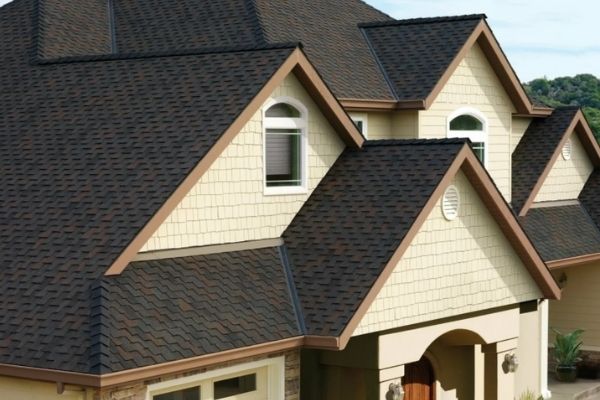
Cross-gabled roofs
Multi-gabled roofs are complex structures that include several compartments, each of which is covered with a gable roof. Also, multi-gable models can consist of several pediments, which are sometimes called gables in construction. There can be two, three, four, or more.
Structures with the multi-gable structures are rarely used in construction. As a rule, they are great for square-shaped private houses or buildings with protrusions. In such roofs, mechanical loads, contact with atmospheric precipitation, and pressure from melting snow are most affected by the ends, which are located between the gables and represent the boundaries of the slopes of two different roofs.
Therefore, at the stage of installing multi-gabled roofs, it is very important to pay special attention to sealing the endowment. For this purpose, a layer of waterproofing membrane or sheet iron is laid on it, on top of which the roofing material itself is mounted. Waterproofing is recommended to be laid on the ends of at least two or three layers.
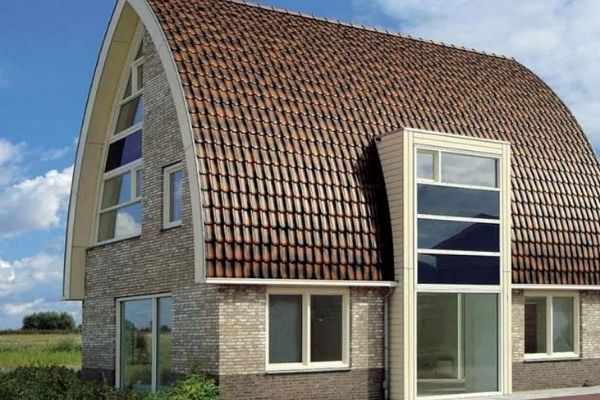
Vaulted roof
The next type of roofing, namely vaulted roof, is used in construction quite rarely because it is characterized by the high complexity of installation as well as the fact that after its installation there is a lot of waste of building materials. As for the construction of such a roof, it has a rounded shape of the truss system, which is characterized by smooth transitions and the absence of sharp corners. Such roofs are not easy to design, therefore, piece roofing materials, including tiles, are most often used for this purpose.
Installation scheme of vaulted structures
The tambourine variety
The design of the tambourine roof is quite complex, and it was put into operation only in the twentieth century. Such roofs are characterized by diamond-shaped slopes that have no breaks. The tambourine varieties are best combined with square-shaped country houses. With the correct roof arrangement inside the building, you can organize a spacious and well-lit attic room. The main thing at the same time is not to forget to provide high-quality heat and waterproofing of the roof.
Calculation of a pitched roof: How to calculate all structures correctly
For the installation of a pitched roof, it is necessary to first select and mount the truss system and other structures correctly. For the correct selection of various elements of the truss system, it is necessary to make the necessary calculations.
1. Load calculation
2. Calculation of the section and step of the installation of rafters
3. Calculation of the lathing step – depends on the material mounted on the lathing
Load calculation
The load calculation consists of the following values:
1. The weight of the roofing layers
2. Snow load
3. Wind load
The formula for calculating the load of the roofing layers
To calculate the load of the roofing layers on the rafter system, it is necessary to use the following calculation formula:
1. Write out the mass of each of the layers of the roofing layers per 1 m2; 2. Sum up all the values obtained for each layer into the final figure (as a rule, it does not exceed the value of 50 km per 1m2); 3. Apply a coefficient of 1.1 (10%) to the resulting value. After applying the above formula, you will receive a load of your roofing layers on the rafter system. Further, the calculation of wind and snow load is performed.
Wind load calculation formula
1. Check the normative value of winds in the area where the house is located according to the normative tables;
2. Calculate the correction index depending on the type of building and its height (number of floors);
3. Multiply the obtained values.
The obtained result will reflect a kilogram of force (kg) per 1m2.
Snow load calculation formula
1. Check the normative value of the weight of snow cover in the area where the house is located according to the normative tables; 2. Multiply by the correction value or coefficient depending on the angle of inclination of the future roof, the value of which depends on the angle of inclination of the roof and is shown in the table below: The angle of inclination. The coefficient value of 25 degrees and less than 1 25-60 degrees 0,7 61 degrees and above. Snow loads are not taken into account. The obtained result will reflect a kilogram of force (kg) per 1m2.
Calculation of the section and installation step of the truss system
Below is an indicative table of generally accepted values. It is important to note that the exact values should be calculated for a specific case and object, depending on its location, roofing materials, region, and other factors.
| The installation step of the rafters in centimeters | The length of the rafters in meters | ||||||
| 3 | 3,5 | 4 | 4,5 | 5 | 5,5 | 6 | |
| 215 | 100×150 | 100×175 | 100×200 | 100×200 | 100×250 | 100×250 | – |
| 175 | 75×150 | 75×200 | 75×200 | 100×200 | 100×200 | 100×200 | 100×250 |
| 140 | 75×125 | 75×175 | 75×200 | 75×200 | 75×200 | 100×200 | 100×200 |
| 110 | 75×150 | 75×150 | 75×175 | 75×175 | 75×200 | 75×200 | 100×200 |
| 90 | 50×150 | 50×175 | 50×200 | 75×175 | 75×175 | 75×250 | 75×200 |
| 60 | 40×150 | 40×175 | 50×150 | 50×150 | 50×175 | 50×200 | 50×200 |
Installation of pitched roof: Step-by-step instructions
Self-installation of a pitched roof is a rather complex process, for which it is necessary to study carefully all stages of construction. In such a case, even a seemingly insignificant mistake can lead to serious consequences related to both finances and damage to the installed structure. Further, we will consider all the stages and subtleties of the technological process of installing a pitched roof.
Step-by-step instructions for installing a pitched roof include the following mandatory steps:
- Design and calculations – before starting any installation of the roof, it is necessary to make the necessary calculations on loads, the pitch of the lathing, heat resistance, and other elements of the roof. All these calculations, as a rule, are made during the preparation of project documentation, which describes all the materials, fixation points, and installation processes of individual elements.
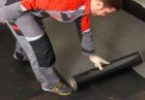
- Preparatory work – at this stage, the necessary tools for the installation process are being prepared and the necessary construction materials are being purchased;
- Reinforced belt — the manufacture of an armored belt, which is installed around the perimeter of the structure and is especially useful for those buildings that are made of light types of concrete or porous blocks. An armored belt is aimed at increasing the rigidity and strength of the structure, as well as its resistance to external influences. When installing the armature, it is important to provide for the fixation of the studs necessary for the subsequent installation of the curb plate.
- Fixing the curb plate, as a rule, the curb plate is fixed to the wall with special fasteners.
- Installation of the ridge – for this purpose, the so-called ridge beam is initially installed.
- Installation of the truss system – the truss structure is fixed taking into account a certain step with strict observance of all necessary parameters. It is on the quality of the installation of this system that the reliability of the entire structure will depend. If you do not have ready-made design documentation, then you can determine the length of the rafters yourself by preparing two boards of standard length (equal to 6 meters) and temporally fixing them on two opposite walls in a vertical orientation.
By lifting and lowering these boards, it is impossible to determine the optimal position of the future truss system. The best length of the rafters is up to 6 meters since longer options cannot be bought at a hardware store: they will have to be made with their own hands or ordered at the factory. - Reinforcement of the structure. At this stage, the completed nodes are reinforced using racks, struts, and tie-beams.
- Vapour insulation installation. The vapor insulation protects the thermal insulation material and other layers of the roofing layers from destruction.
- Thermal insulation installation. Designed to keep the heat inside the room. The thermal insulation material is selected based on its characteristics and the type of roof to be installed.
- Installation of waterproofing. Waterproofing prevents the ingress of water and moisture formed as a result of precipitation or snow melting into the roofing layers and the room itself.
- Installation of a counter-lathing. The counter-lathing is installed for ventilation of the mounted roofing layers.
- Installation of the lathing. The lathing serves as the basis for the future laying of the finishing coating of the roof.
- The installation of the finishing roofing – at this stage, a finishing coating in the form of soft tiles, metal tiles, profiled sheets, or other possible coatings are fixed to the completed crate.
- Installation of the drainage system. After the roof is installed, it is necessary to take care of the proper flow of water through a system of gutters and downpipes.
- Installation of snow holders – for the safe and long-lasting operation of the roof, it is recommended to install so-called snow holders.
Further, we will study the individual elements of roof layers, which should be performed in strict accordance with the recommendations of specialists.
Important: Proper installation of a pitched roof will ensure the reliability and durability of both the roof and the whole house.
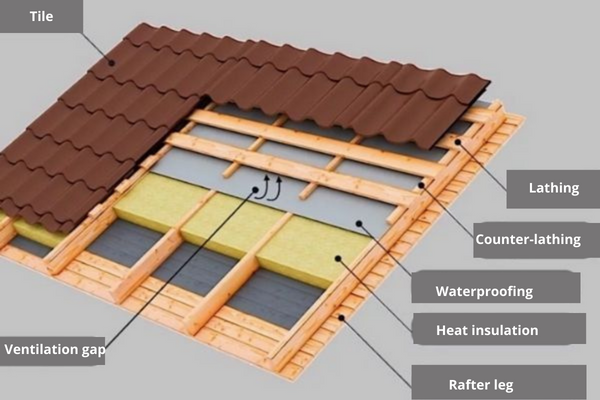
Diagram of pitched roof layers and all its elements:
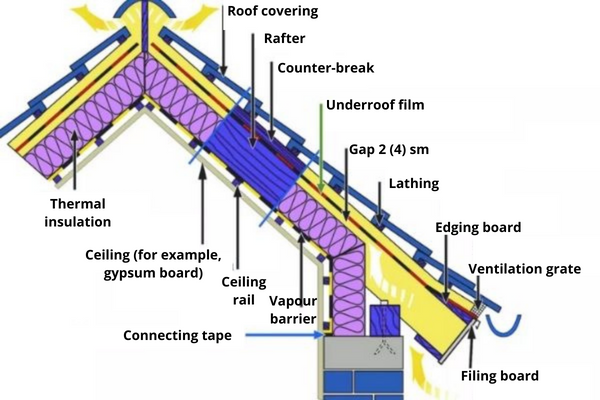
Installation of curb plate
Curb plate can be described as a beam made of wood, the main purpose of which is– to support the rafter system. It is laid on top of the outer walls along their entire perimeter. The task of the curb plate is to distribute loads exerted by individual elements of the truss system over the entire area of the upper part of the wall structure. In addition, the curb plate ensures the connection of the roof with the load-bearing walls of the structure.
Wooden and frame structures do not need to install this element, and for timber and log buildings, its role is played by the upper crown. Regardless of the product used, it is important to ensure that the rafter system can be displaced without threatening to deform or even destroy the house during the inevitable shrinkage of the walls.
The upper binding, which performs the role of a curb plate in frame structures, is fixed to vertically mounted frame elements using staples, nails, or various perforated metal angles. The installation of the curb plate on brick structures involves the use of various diameters of studs or anchor bolts, as well as metal brackets intended for this purpose. The last fastening option is used as follows: one edge of the bracket is connected to the curb plate, and the other to a wooden bar laid on the inside of the wall with an interval equal to 3-4 rows from the upper binding.
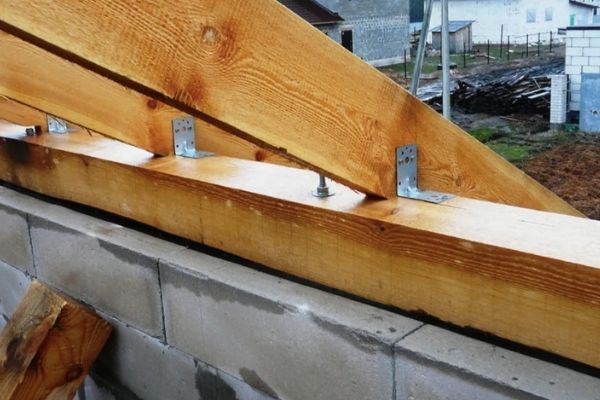
Installation diagram of the curb plate node:
The installation of the rafters to the curb plate
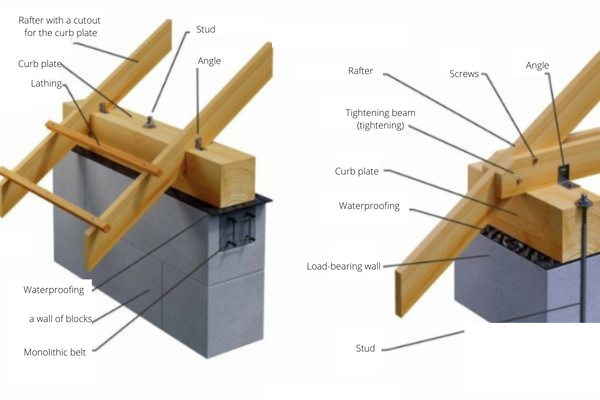
In some buildings, especially those made of stone or brick, it is necessary to ensure a strong connection between the elements of the rafter system and the curb plate. Reliable fastening of these products to each other will allow you to equip a pitched roof of any type, for example, to mount a hinged or hanging rafter system. Fixation can be carried out with or without cutting.
Refusal of cutting means that the removal of the cornice will be provided by the rafter elements themselves. It is worth noticing that this type of fixation is performed much easier than connecting with a cut, so this method is perfect for inexperienced builders. For connection, in this case, support bars are used, which are fixed on both sides through special corners equipped with holes for self-tapping screws.
The use of cutting also involves the preliminary preparation of the rafters, that is, their cutting in such a way that they fit snugly enough to the curb plate. In this case, fillies act as a cornice overhang, which should be fixed to the rafters with an overlap of one meter. The use of angles for rigid fastening will help to increase the reliability of the structure.
Diagram of the installation of the curb plate node:
Installation of rafters for the construction of a load-bearing wall
At the stage of installing the rafters, you can use a proven method of strengthening the truss system, as a result of which the stability of the future roof to the effects of wind will noticeably increase. To do this, the frame of the truss system is additionally connected to the load-bearing walls of the building. Such fastening is provided by means of two pieces of metal knitting wire type, small diameter (maximum 4 mm): it is wrapped around the fastening of the rafters and the curb plate, and then fixed to the wall using a rag bolt or anchor bolts.
The installation of reinforcement units for the rafter structure
Strengthening the frame of the structure with the help of special racks and struts is necessary in order to equip the roof properly. This is especially true in cases where the span exceeds 6 meters. Let’s talk about each of the products used to strengthen the frame in a little more detail.
The struts are located relative to the horizontal surface at an angle of 45 or 60 degrees. The racks are installed in a vertical orientation, and necessarily so that they rest on a load-bearing wall, beams or spangles thrown over the walls of the building.
The bolt or tightening is necessary in order to minimize the efforts of the strut.
Their use is especially efficient in cases where the installed truss system belongs to the hanging type. Tie-beams are fixed to the rafters on both sides, and for this, as a rule, nails or screws are used.
Mounting scheme of reinforcement unit:
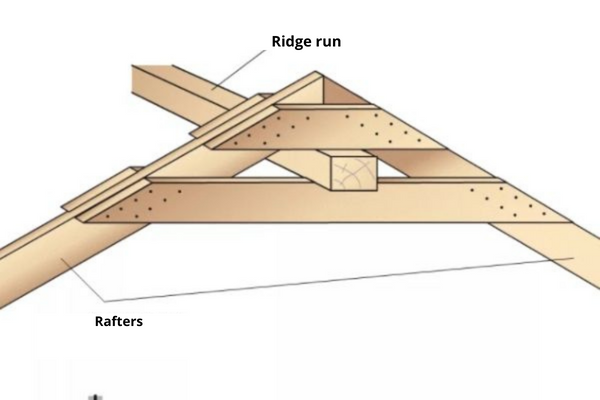
Fastening of rafters to the girder
It is important to understand that in pitched roofs, the rafters, located opposite each other, converge at the top point of the roof and rest against the ridge run, which is also sometimes called intermediate. For its manufacture, a beam with a cross-section from 5х10 sm to 10х20 sm is used, and the size of the cross-section of the beam varies depending on the characteristics of the truss system and the size of the span. The connection of the elements of the rafter system with each other is carried out using different types of fasteners, for example, bolts, screws, various plates, and just nails.
Diagram of the rafter fixation unit to the girder
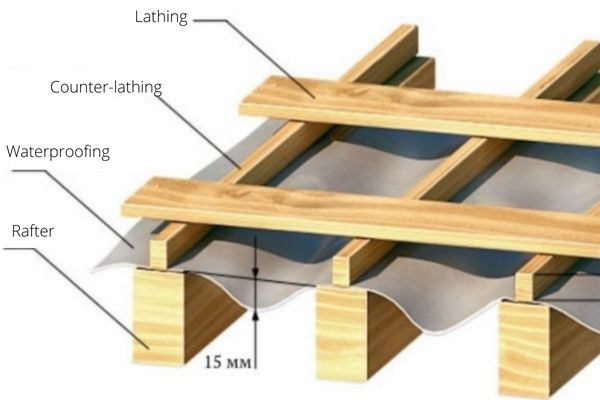
The installation of the lathing and counter-lathing
The installation of the pitched roof is carried out in such a way that the final coating is laid on a roof prepared in advance so that the final coating fits on a lathing prepared in advance. Before the last lathing, as a rule, there is a counter-lathing.
To date, there are two types of lathing:
1. Solid lathing. Suitable for roofing made of tiles, made of bitumen. For its installation, a solid coating is required, on top of which a lining carpet is necessarily laid.
2. Sparse lathing. Relevant for most materials. The installation of a sparse lathing involves the preliminary installation of waterproofing, which is mounted to the elements of the rafter system using a tool such as a conventional construction stapler. In the area, coinciding with the end of the cornice overhang, the film is fixed to the drip, the main purpose of which— is to remove moisture trapped on the hydrophobic membrane into the drains. Waterproofing cloths are fixed to each other with a special adhesive tape.
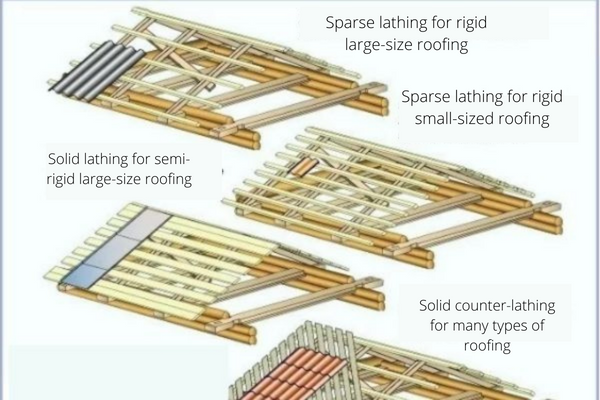
Important: For the installation of the lathing, first, it is important to mount the counter-lathing, the elements of which are laid parallel to the rafters. The thickness of the material used, as a rule, does not exceed 4-5 sm. Then, perpendicular to the bars of the counter-lath and, accordingly, to the rafters, the boards of the lathing are stuffed. Their pitch and dimensions are determined depending on the material used to install the roof finish coating (for example, one step is needed for metal tiles, and another for ceramic tiles, since the size of the sheets is different).
The mounting unit of the lathing and counter-lathing to the rafter system:
Waterproofing of pitched roof
One of the most important elements of a roofing layers — is waterproofing. Waterproofing is designed to prevent water and moisture from penetrating into the roofing layers, and then into the house or building.
As a rule, waterproofing membranes are fixed to the elements of the rafter system using galvanized nails with a flat head or staples of a mechanical stapler with fixing with counterparts. Waterproofing membranes are connected to each other through the use of double-sided adhesive tape or special tape. By this method, it is possible to ensure complete tightness of the under-roof space and, as a result, its protection from leaks and purges.
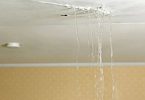
Important: Incorrectly installed and selected waterproofing membrane will necessarily lead to roof leaks, the elimination of which may entail expensive repairs, including complete or partial dismantling of the roofing and the completed lathing.
As a rule, the following types of materials are used as waterproofing of pitched structures:
- Classic or standard films
- Diffusion membranes
- Superdiffusion membranes
You can read more about waterproofing of pitched and flat roofs in the following articles:
- Waterproofing of metal roofing: Materials and technology of their installation under metal roofing of cold and warm roofs
- Waterproofing of the roof: methods of its installation and types of materials for performing high-quality work
- Waterproofing of a flat roof. Recommended materials, methods of their installation, and prices for work
- Roof waterproofing repair: Methods, materials, and prices
Ventilation of the roofing layers
A competent ventilation system will save the pitched roof from the formation and accumulation of condensate in the under-roof space. This phenomenon is quite dangerous because it can lead to the formation of cracks, holes, and other damages in the elements of the roof layers or even to the destruction of the roof. As for wooden products, ventilation will reliably protect them from the formation of areas of dampness, fungus, and mold and, as a result, significantly extend their service life.
At the stage of arrangement of ventilation of the under-roof space, it is important to observe the following rules:
- Ventilation should include a ventilation gap of 2 to 4 cm in size, its presence can be ensured by installing a counter-lathing on the elements of the rafter system;
- The cornice overhang, through which the air supply is provided, is necessarily sewn with the help of special perforated soffits;
- To ensure the air outlet at the top point of the roofing, it is necessary to install aerators (from one to several), and both ridge and point type products can be used.
Diagram of the ventilation installation of the under-roof space:
Installation of pitched roof
Installation of thermal insulation material is recommended to be carried out after the installation of the roofing. As a rule, the thermal insulation of pitched types of roofs is mounted from mineral wool formed in the form of slabs. At the same time, the thickness of the material is selected based on the climatic characteristics of the region in which construction work is carried out.
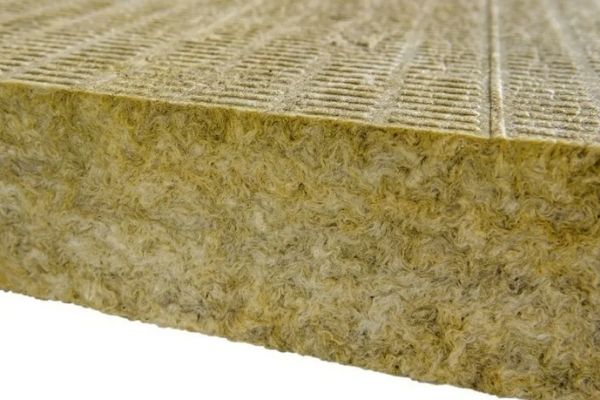
For example, slabs with a thickness of 15 to 20 sm are quite suitable for the middle part of Russia. Mineral wool is placed between the rafters by surprise, which allows it to stay in place without the use of any additional devices. The thermal insulation composition is mounted between the vapor barrier and waterproofing, and the vapor barrier is fixed to the insulation with adhesive tape.
Only after laying insulation, it is possible to organize the flooring of the waterproofing membrane.
The scheme of installing thermal insulation in the layers of a pitched roof
Installation of the final coating
The next stage of the roof arrangement is the installation of roofing, which can be done independently or entrusted to professionals. The choice of a suitable material is based on the slope of the roof, as well as aesthetic and financial considerations. However, it is extremely important that the coating is reliable, airtight, and durable, so it is definitely not worth saving it.
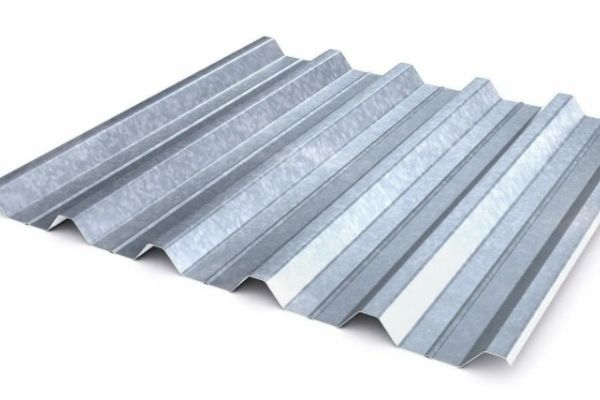
The finishing coating may consist of the following materials:
- Profiled flooring. Profiled roofing, for example, is characterized by ease of manufacture, transportation, and installation. Due to such properties of the material, its installation is carried out without much difficulty and in a fairly short time. Also, profiled flooring is characterized by resistance to any environmental influences, including humidity, temperature changes, contact with chemicals, ultraviolet, and not only. The sheets of profiled flooring are fixed to the base with the help of screws with a hexagonal head, and the installation of screws is carried out perpendicular to the lathing and, accordingly, to the profiled sheets. It is recommended to seal all formed joints with bitumen mastic or special tapes. The length of the screws is determined based on the wave height of the sheet of material. Regardless of the size of the sheets, this material is lightweight and unable to damage the rafter system.
Metal tiles. The arrangement of gable roofs using metal tiles can be carried out in any direction with the obligatory observance of overlap in one wave. Tent structures overlap from top to bottom starting from the highest point of the roof. Before installing metal tiles, it is important to check the integrity of the lathing, since the performance characteristics of the roofing structure directly depend on it.
During the joining of metal tile sheets with additional roof elements, gaps are formed, which are necessarily filled with silicone sealants or sealing tapes upon completion of the work. The optimal length of the roof material sheet varies in the range from 4 to 5 meters, while the lower sheets are installed so that they protrude above the cornice level by at least 5 sm.
In the case of hip, half-hip, and tent structures, it is necessary to determine the center of the slope, mark the central axis on the metal tile sheets and combine the central axis of the roofing material with the central axis of the roof. The sheets fixed in the center are temporarily fastened with screws, and the following coating elements are located on the sides of them. After that those parts that remain protruding are cut off.
Metal roof. The properties of the elements of the metal roof are necessarily prescribed in the project, and the material is made on the basis of these data. When it comes time to start work, first of all, a special collar is cut around the chimney, which will prevent water from getting under the coating.
Then the longitudinal elements of the roof are fixed to the working surface, and the edges of the metal on the sides are bent, that is, the folds are prepared. The resulting blanks are laid from the ridge on the trusses and their location is checked, which should be strictly vertical. Only after that, the roof is fixed to the lathing with the help of clamps.
The roof projections in the ridge area on the side of the two ramps should be of two different lengths (for example, on one side-6 sm, and on the other-3 sm). The seals, fasteners, and other elements used are determined depending on the characteristics of a particular metal material. After laying the metal on the work surface, they proceed to seal the joints with a hammer and a special metal strip.
Composite shingles – If composite shingles were chosen as the roofing material, the installation of the lathing should be carried out in the direction from top to bottom, observing the exact interval. Composite tiles are laid on the lathing also in the top-down direction and fixed with anti-corrosion nails.
In this case, the fastening is carried out at the end and under the wave, otherwise, the hardware will be exposed to too much rainwater. In places such as hip ridges, endowments, ridges, abutments to the wall, and bypasses of roof elements, sheets of composite tiles are necessarily bent at the edges.
A high-quality sideboard is able to provide under-roof ventilation, as well as protect all potentially dangerous areas from the effects of atmospheric precipitation. To trim composite tiles, a special tool is used— a guillotine and small cuts are performed with scissors.
Flexible roof tiles. Flexible roofing materials are suitable for the design of any pitched roofs, no matter what angle of inclination and architectural complexity they differ. The exception is bitumen and ceramic varieties of tiles, which are not recommended to be laid on roofs with an angle of inclination of fewer than 12 degrees.
Before laying the roof, the working surface is prepared, the lathing is fixed, ventilation and insulation materials are designed, and only after that – is the laying of flexible tiles. It is worth noting that the installation of such a roof is carried out in the form of a solid base without protrusions and gaps. It is also important that the insulation is carried out in warm and dry weather
Additional information about metal roofing can be found in the articles:
- Waterproofing of metal roofing: Materials and technology of their installation for metal roofing of cold and warm roofs.
- Repair of metal roofing: Technology and prices.
Drain
A drainage system is necessary for any roof, including a, pitched one. This need is explained by the insufficiency of cornices for the removal of liquid that can destroy the elements of the roofing layers and the walls of the structure, especially those made of concrete, wood, brick, or treated with facade plaster.
Damage to the walls leads to the loss of their thermal insulation properties, and water falling from the roof can destroy not only the walls but also the foundation. As a result, there are many problems that can be avoided if a drainage system is installed in advance.
The nature, structure, and properties of the drainage system depend on the shape of the pitched roof. The simpler the roof structure, the fewer gutters, channels, and drains the water drainage system will include.
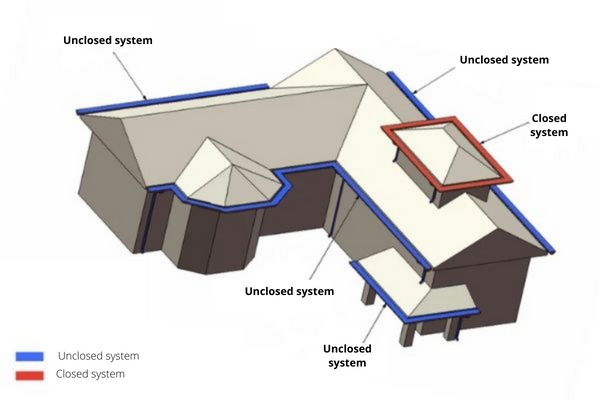
Modern drainage systems are divided into two types:
1. Closed. It is most suitable for hip, half-hipped, and other complex structures. Such a drain should bypass the building along its entire perimeter, and all elements of the system are interconnected, so there are simply no blind branches. For hip roofs, liquid removal is required in both directions at once, so in this case, the pipes are installed at the corners with rounding to the larger side of the roof.
2. Unclosed. An unclosed drain is typical for simpler roofs, for example, gable roofs. In this case, two separate lines are installed, assembled from gutters, each of which has its own drain. Gable, half-hip, and multi-gabled roofs assume a system of water drainage through gutters to pipes, which liberate the roof surface from excess liquid.
Prices for the installation of a pitched roof
| Description of work | Unit of measurement | Price in $ |
| Dismantling works | ||
| Dismantling of roofing | m2 | starting from 8 |
| Dismantling of the lathing | m2 | starting from 10 |
| Dismantling of the rafter system | m2 | starting from 9 |
| Dismantling of the thermal insulation | m2 | starting from 9 |
| Dismantling of waterproofing | m2 | starting from 5 |
| Dismantling of the ridge | running meter | starting from 14 |
| Works on the installation of individual elements of the pitched roof | ||
| The installation of the truss system | m2 | starting from 20 |
| Installation of the lathing | m2 | starting from 10 |
| Installation of the counter-lathing | m2 | starting from 10 |
| Installation of valley boards | running meter | starting from 14 |
| Installation of the lathing with valley board | m2 | starting from 50 |
| Installation of counter-lathing with valley board | m2 | starting from 50 |
| Installation of window sills | running meter | starting from 50 |
| Installation of curb plate (support for rafters) | m2 | starting from 30 |
| Installation of chimney | piece | starting from 100 |
| Installation of an attic window | piece | starting from 280 |
| Installation of roofing layers and elements | ||
| Installation of vapor barrier | m2 | starting from 5 |
| Installation of a waterproofing membrane | m2 | starting from 4 |
| Installation of thermal insulation | m2 | starting from 8 |
| Installation of the ventilation grid | running meter | starting from 20 |
| Installation of the end cornice | running meter | starting from 80 |
| Gluing of the smoke shaft with a corrugated waterproofing ruffle | running meter | starting from 50 |
| Installation of a drainage system | ||
| Installation of a gutter with a funnel and a pipe | running meter | starting from 50 |
| Installation of a storm drain pipe D=100 | running meter | starting from 80 |
| Installing the funnel | piece | starting from 55 |
| Installation of a drip tray with an inset into the wall | running meter | starting from 30 |
| The installation of snow holders | running meter | starting from 12 |
| The installation of finishing coatings of pitched roofs | ||
| Laying of metal tiles | m2 | starting from 20 |
| Laying of ceramic tiles | m2 | starting from 28 |
| Installing a ceramic ridge | running meter | starting from 50 |
| Installation of flexible roof tiles | m2 | starting from 20 |
| Installation of profiled flooring | m2 | starting from 20 |
| Installation of composite roof tiles | m2 | starting from 18 |
| Laying of cement-sand tiles | m2 | starting from 23 |
| Laying of natural tiles Braas (Braas) | m2 | starting from 14 |
| Installation of a profiled sheet | m2 | starting from 14 |
| Installation of slate | m2 | starting from 10 |
| Installation of a copper sheet | m2 | starting from 20 |
| Installation of euro slate | m2 | starting from 14 |
| Installation of a seam covering | m2 | starting from 27 |
| Installation of a copper coating | m2 | starting from 60 |
| Installation of a zinc-titanium coating | m2 | starting from 70 |
| Installation of a slate roof | m2 | starting from 70 |
| Expertise and project | ||
| Preparation of project documentation | piece | starting from 1500 |
| Visual examination of the roof for leaks | piece | starting from 100 |
Online-calculator of installation of pitched roof
Расчет стоимости устройства скатной кровли под ключ
Итоговая стоимость работ
Repair of pitched roof
Repairs may be required not only for the finishing coating of the roof but also for such elements of the structure as a rafter system, a ridge, a lathing, and a drain. Repair methods are different and depend on the type of roof and its coating.
Several reasons may lead to the need for roof repairs:
- Damage to the roofing — cracks, dents, holes, and others. They can be formed during snow removal from the roof, during cleaning of roofing materials, during roofing works, or during its operation.
- Depressurization of the seams of the roofing – involves a violation of connections of the roof with the additional roof elements, such as a chimney, parapet, antenna, skylight, and more.
- Damage to the gutter – lead to destruction and moisture ingress on the load-bearing walls of the structure.
It will be most reliable to entrust the repair to professionals, but if you have the proper skill, you can handle such work yourself. The main thing is – not to abandon the recommendations of specialists and clearly follow the instructions for repairing the roof.
You can read more about the repair of various types of roofs in the following articles:
- Repair of metal roofing: Technology and prices
- Repair of the roof of a private house, an apartment building, and an administrative building on a turnkey basis
- Roof waterproofing repair: Methods, materials, and prices
- Waterproofing of metal roofing: Materials and technology of their installation under metal roofing of cold and warm roofs
Design of pitched roof
In order to make a competent pitched roof project, it is necessary to follow the design stages indicated by professionals. First of all, it is important to choose the shape of the roof (gable, tent, attic, and others). Each of the types of structures has been described in detail above. Then it is followed by the choice of roofing material and the calculation of the slope angle depending on the selected option. For example, the minimum angle of inclination for a rolled roof is 0 degrees, and for bitumen and ceramic tiles, this indicator is 12 degrees.
After choosing the type of construction and roofing materials, a detailed sketch of the roof is made, indicating its shape, size, color, and nature of the finish. After drawing up the project, which should be approved by both the owner of the house and specialists in the field of construction, you can start calculating the roof.
Calculations include the determination of the bearing capacity of the roof structure, the calculation of the length and cross-section of the elements of the truss system, as well as the maximum permissible loads on the roof. At the same time, it is important to leave at least a 10% margin, assuming a possible increase in the load on the rafter system
The last stage of drafting is considered to be the calculation of wind loads, which depends on the height of the structure. For structures above 20 meters and, moreover, located in an open area, the correction factor is 1.25. If the structure is located among other buildings, the coefficient is 0.85. For buildings with a height of 10 to 15 meters, there are indicators equal to 1 and 0.65, respectively. In the case of houses below 5 meters, coefficients from 0.75 to 0.85 are indicated.
Pitched roof installation services
You can order services for the installation or repair of pitched roofs from us. Highly qualified craftsmen will make a complete and competent project, select the necessary materials and perform their work efficiently and in a short time. Today, you can place an order for the installation off the roof of a private house, a multi-story building, or an office building. Moreover, the simpler the design of the house, the greater the variety of roofing materials, suitable for its installation.
When choosing a construction company, be sure to rely on factors such as experience, professionalism, and quality